How to create dependent drop-down lists in Excel
Excel is not just a useful tool for create spreadsheets . The truth is, because of its multiple functions, it is also used to organize lists of all kinds. The more options we master in Excel, the more practical the different tasks become.
As we always say, training in office software is essential to be of value in today's job market. By being more efficient and practical, we will make companies like us in their offices, occupying attractive positions. For all this we will today you learn how to create dependent dropdowns in Excel .
Don't limit yourself to this software, try reading our guides on the entire Microsoft Office suite. By practicing and memorizing its content, you will advance at surprising rates.
Well, the interfaces of the Office family are quite similar, that is, practicing in one will improve your skills in the others. The important thing is that you go at your own pace, consulting the tutorials whenever necessary.
Consider that in order to perform the steps as you read, you must have downloaded and installed Microsoft Excel from its official website . Although this is a paid program, it will represent a excellent enhancer for your CV , so we recommend that you buy it as soon as possible from Microsoft Corporation official website.
In addition, it would be good if you already have minimal knowledge of some basic tools.
What is Excel?
Going back to what we mentioned at the start, Excel is a spreadsheet, yes. But, with so many options, it becomes useful for all kinds of tasks. You can use it, for example, for create graphics à two axes or all kinds graphics , diagrams to help you get organized or, as in this case, dependent drop-down lists.
The possibilities are as numerous as your creativity allows you. Thus, we insist on experimenting for ourselves after seeing the content of the guides.
What are Dependent drop-down lists?
It is something quite simple. It is those lists in which you tap a certain category, and the options belonging to that category are automatically displayed. They allow you to do more practical arrangements without see a lot of data at the start.
How to create dependent drop down lists in Excel?
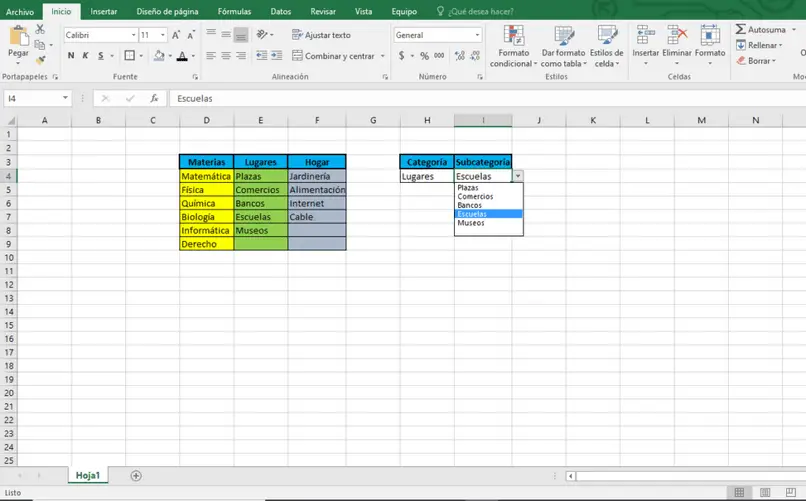
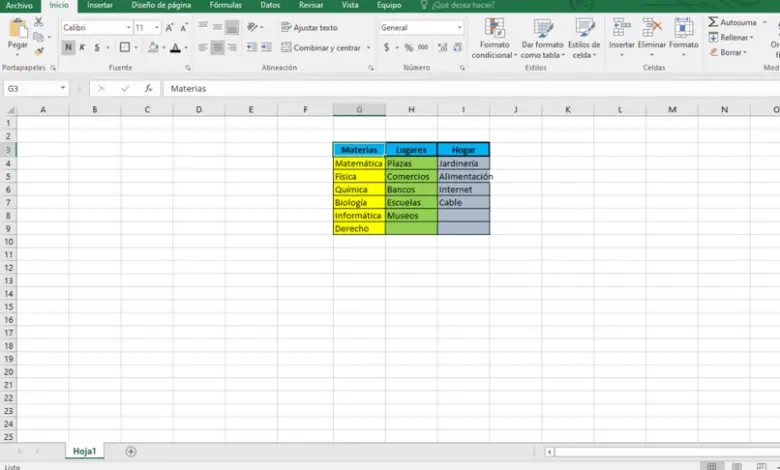
The first thing you will do is go to your Microsoft Excel. Once in the document, you will need to enter the data you plan to list . You can occupy as many columns as you want and place your items in the cells below the one with the column name, as the following image shows.
You will see that in our example, the categories are Subjects, Places and Domicile . Now you have to assign a name to the elements of each category . In other words, you will select all the elements of the topics (by moving the cursor), and, in the middle bar where the coordinates of the selected cells are displayed, we will remove what it says to write topics .

We have to repeat the process with all the columns. Later, in two separate cells, we will write, for example, “Category” and “Sub-category”. We click on the cell under the “Category” cell, and we will access with tab Data at the top of the screen.
There we will select the data validation , then again data validation , to display a window.


Now in the game To allow , you will choose the option List . And, in the area Origin , you will put an equal sign then you will drag the cursor through the category cells (in this case Subjects , Locations et Home ). You accept the changes.
Finally, you will return to the menu of data validation , but this time with the cell under the selected "Subcategory" selected. You will choose the option again List , but now in Origin you write =indirect() , then click between the parentheses, and then press the cell under "Categories."
Accept the changes and you're done. You have successfully created a dependent drop-down list.