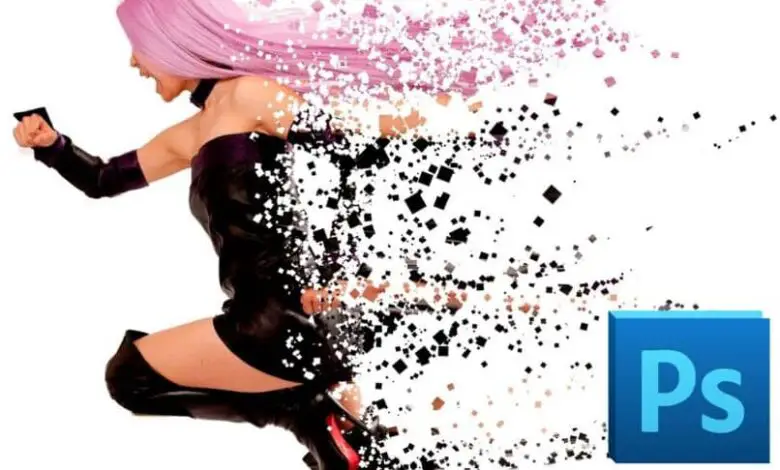
How to do the particle scatter effect in Adobe Photoshop - step by step
What is Photoshop and what is it for? The Photoshop program is a program designed by the graphics systems company Adobe. This program is a multiplatform that focuses on processing ordinary images and the application of various effects for their transformation.
Adobe Photoshop allows users to edit images by applying a large number of tools and filters . Is the program more complete in how much has the creation of optical ilusiones and gráficos retoques, el artista bien puede corregir ciertos ciertos de las tomas o transformar all su contenido utilizando las herramientas para alinear y centrar textos, images y objetos , quitar reflecto , resize images , Among others.
How to do the particle scatter effect in Adobe Photoshop?
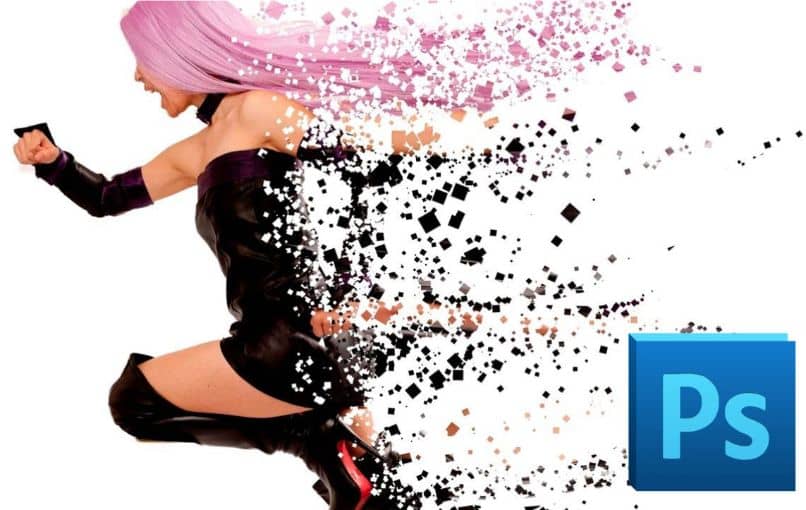
There is a well-known Adobe Photoshop tool in the industry, it is the so-called dispersion effect . This is an image editing that resembles the gradual disintegration of shapes and figures. Either in dust particles or other options.
To apply this effect, it is not necessary to have great knowledge in the field or to be a master in the subject. Today we show you how to do the scatter effect.
Steps to Create Particle Scatter Effect in Adobe Photoshop
The first thing to do is to duplicate the layer containing the image. You can do this by clicking on the secondary button and selecting the option "Duplicate layer" or by pressing the CTRL + "J" keys to do it directly.
Once duplicated, you must deactivate the top layer visibility and select the bottom layer or the copy, now an outline should be drawn around the edges or the figure of the person or object in question. To do this, click on the toolbar on the left of the screen and select the option "Lasso Tool" . Then do the outline (this shouldn't be exact).
Right click and select the option "Fill in / Content" , then in the subdivision choose the option "According to / Content" . Then press Ctrl + »D» to cancel the selection. The program automatically shows the content that it has created for us, instead of the parts of the figure that we delete with the "Particle Brush" .
Activate the visibility of the top layer again and select in the toolbar "Quick selection" , it can be found in the tools panel on the left.
Then draw an outline of the edges of the figure and right click, then choose the option "Apply the mask" . You can use the brush to refine the edges and improve the selection. Finally, click "Layer mask" and select "Okay" .
Dispersion effect
Now the dispersion effect can be created. For this we will create two layers again . In one we go create the effect of dispersion himself; while in the other, it is about create the effect of decay particles on the model. To do this, you need to follow the following steps:
- Select the layer that has the mask and create a copy (for this use the letters Ctrl + J)
- Right click on the layer mask and select "Apply layer mask" , change the name of the layer and type "Dispersion" .
- Now duplicate the "Scatter" layer and change its name to "Model" .
- For the result to be adequate, you must have the layers in the following order:
- Model layer visible.
- Visible dispersion layer.
- Layer with mask not visible.
- Visible undercoat.
Create the dispersion effect
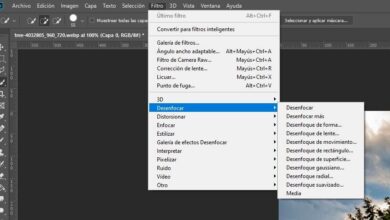
- You must select the layer "Dispersion" , click on the menu, select the effects then click on "Liquify"
- Click on the tool "Warp Forward" to choose the orientation in which you want to create the scatter effect. "
- Press the Alt key + Mask to apply the black color to the layer "Dispersion" .
- Then click on the layer "Model" , create a copy and select it.
- Click on the toolbar, choose "Brush" and select the black color of the brush.

- Choose eraser brushes, type particles of different sizes. You can rotate as you apply to create a better finish.
Finally, you can try different effects to practice and give each image a much more authentic and personal touch.