How to create an Amazon account for free, easily and quickly? Step by step guide

Today almost everyone knows the American company Amazon , since most of the purchases made on the internet are done through this e-commerce portal. Amazon was founded in 1994 , and since then it has grown steadily to become what it is today, a giant global e-commerce store.
We can say that on this site you can find all kinds of products , it is the store where you can buy everything that exists, the imaginable and even the unimaginable.Amazon was the pioneer of e-commerce , and therefore publicized the advantages that this type of sale offers on a digital level. Amazon's success is behind some concrete keys.
The rapidity with which orders arrive at their customers' homes, the comfort of the whole process (the customer doesn't even have to get up from the sofa to buy the products) and The price of the products bought (multiple times) They give us amazing deals that physical stores cannot.) As a result, there are many reasons to buy the products we want through this platform . To start using this platform, we need to meet certain conditions.
How to create a new account to buy on Amazon?
The most essential is to have an account registered with Amazon to be able to make the purchase , you have to comply with it, because without an account you cannot carry out sales operations within the portal, and not a lot of other things. In addition, customers who have an account can enjoy many other benefits. In this article, we'll show you which types of accounts can be created on Amazon and the guidelines for creating them. Let's go!
Registering a new account with Amazon is a simple and easy task to complete , the website usually shows how to enter a new user account. Nevertheless, we will teach you the steps one by one so that the process becomes much easier.
1 - Go to the official website to register

To be able to you register as a user on Amazon , access from on board here and you will enter directly into the registration form for the version Spanish , if you are in another country, access the specific platform for your region or directly on Amazon.com generically. Once there, in the upper right part, we find " Accounts and Litas "And below, we click on" Start here «.
2 - Enter user data
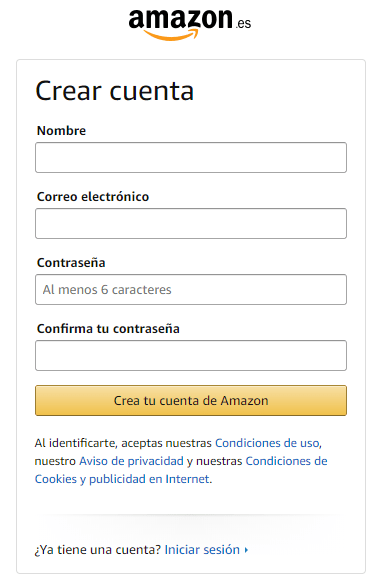
We fill out the form with personal information, the data we need to provide are:
- name
- Password (minimum 6 characters)
- We repeat the password to confirm
And then we click on the button " Create your account on Amazon »With this we accept the terms of use and the privacy policy.
3 - Configure our delivery address
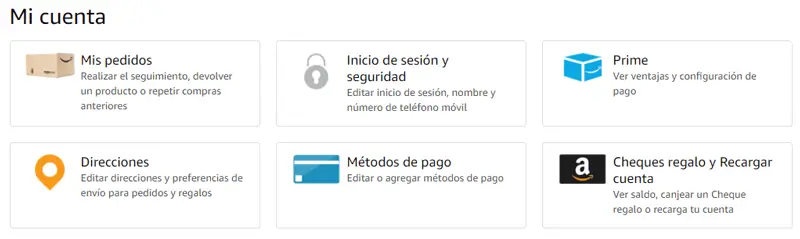
We have already created our account, now we will have to enter different data to configure our profile, for that we go back to the top right in » Accounts and Lists "And if we put the mouse over it, a menu will appear in the drop-down list, we click on" Account "And then" Address "And then" Add an address ».
Here you can configure your delivery address to use while we shop on Amazon, the data to be entered is as follows:
- Country of residence
- First and last name
- Postal address (street, number, floor, etc.)
- City
- Province or region
- Postcode
- Telephone or mobile number
And we click on " Add an address ", This process has many advantages, because in the following orders we will not have to enter any data, because Amazon will remember the delivery address and the purchase process will be faster . It is possible to include more delivery addresses , but we'll have to mark one as the first option.
4 - Configure payment methods
It is now the turn to enter our credit card information with which we will make our payments on this platform, for this, as in the previous step, we access "Accounts and lists"> "My account"> "Payment methods" .
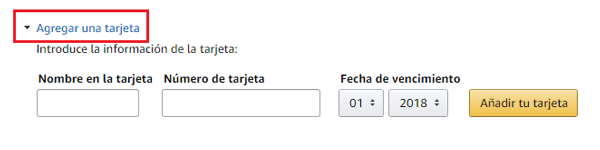
We are going in " Add a map »And we fill in the information requested below:
- Name on card (the full name that appears on our credit or debit card)
- Card number (it will be a series of 16 digits in 4 series of 4 numbers)
- Expiration date (month and year)
With this step we provide the payment data that we will use in our purchases, that is totally safe because Amazon uses the highest security measures in terms of e-commerce.
You have already! If you have completed the whole process, you already have your own Amazon account. Take advantage and start using this awesome online shopping tool.
How to open an account to sell on Amazon? Professional FBA Seller
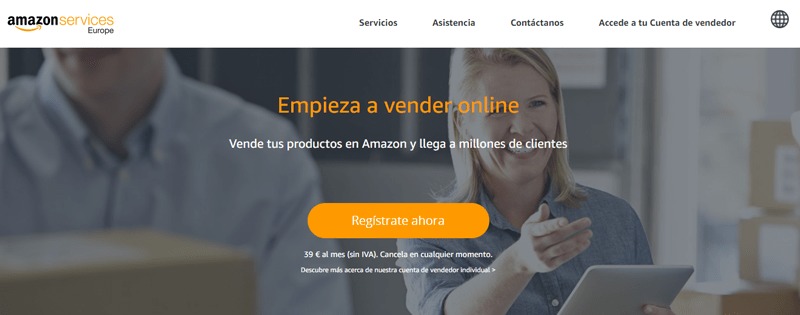
A very succulent way to generate income is to use the platform for sellers on Amazon, and if this website is so big in content and products for something, it's because thousands of sellers are posting theirs there. own products and third-party products. If you want to start selling on Amazon, we've given you the steps to get you started.
1 - Enter the official sellers website
To start the Amazon FBA registration, go to the following URL:
- https://services.amazon.es/ (this is the website for Amazon.com users)
- https://services.amazon.com/ (for sellers on Amazon.com)
“UPDATE ✅ Do you want to know how to enter and register for the world's largest online shopping portal? I explain ✅ STEP BY STEP how to sell and buy on Amazon easily, simply and quickly. ⭐ ALL THE ANSWERS ARE HERE ⭐ More tips and advice from other users. "
Once there, click on the orange button that says " Register now " in the absence of, " Start the 30-day free trial * ».
2 - Complete the registration form
If we already had a particular user account, it will ask us to enter our email and password information, in case you do not want to use this account, we will choose " Create your Amazon account «. We will follow the same steps as in the previous case, it is recommended to use a corporate email to be able to separate our seller and buyer accounts.
Once done in the previous process, and accessing the aforementioned URLs, we proceed to start the registration of professional sellers correctly , in this first step, we will be asked the following:
- The country where our head office is located
- The type of business (private, listed, public, charitable or private)
We select the options that suit our circumstances and another option will appear, that of our personal data if we choose private , Or company name if we select one of the other options , in which case we fill in the fields with reliable data and press In " Accept and continue ”, We accept the policies of Amazon.
3 - We start to fill in the company or personal data
This step can change depending on whether we have chosen a company or a private seller, in this case we will explain what data we will need to fill in for private sellers.
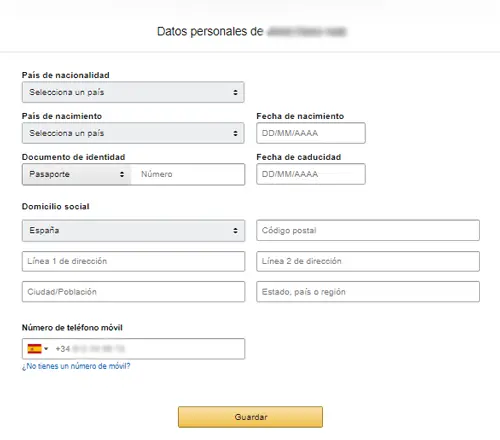
- Country of nationality
- Native country
- Date of Birth
- Identification document
- Document expiration date
- Head office (address, postal code, city, country, etc.)
- Contact phone number (* this must be verified by entering a code PIN , we can choose to send the PIN code by SMS or phone call)
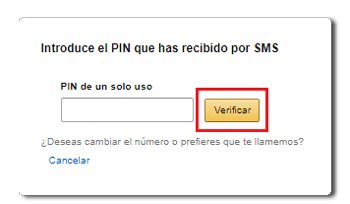
It is very important to fill in the fields with truthful data because in the future we will have to corroborate this information with the delivery of official documents. We give " Save And let's move on to the next step.
4 - Payment information
In order to receive payments for our future sales on Amazon, we will need to provide our card details, for this we enter the card number, expiration date, card holder and assign a mailing address . It is recommended to use a card whose holder corresponds to the account holder AmazonFBA . And we click on " Save To go to the next step.
5 - Additional information

In this case, we will only have to select card where expenses and income will be charged. If we choose in the registration process that we are a company, we will have to provide information of invoicing, taxes and others until all fields are completed. It is always recommended to use real data, because as we have commented, in the future we will be asked to verify all this data to confirm its veracity by means of official documents.
6 - Store name
We are almost done, in this last step Amazon will ask us to give a name to our shop , the most common being to choose a name that can relate to the type of products we offer. We click on the button " Start publishing products And the registration process for Amazon Professional Sellers will be complete, and you can begin to include your new products for sale. Good luck on your new trip!
Is it possible to create an Amazon account without having a credit card?
In principle, it is not possible to create an Amazon account without having a credit card. , however, as we commented before, in the creation process they do not ask us for any card information, as we have to include it later or during our first purchase.
But if we want to download apps, books or free music (mostly media content) from the Kindle store , it will not be necessary to include our credit or debit card data. To do this, we return to "Accounts and lists" in the drop-down menu we select “Manage content and devices”.
We are looking for the option "Settings", once this tab is open, we go directly to " Kindle Payment Settings "And select" Change the payment method »And fill in the required fields one by one. We will also have to change the option " Settings of Countries »And select our country of residence.
You can now access the Amazon Kindle store and download all free content without having to enter your credit card details.
If you have any questions, please leave them in the comments, we will get back to you as soon as possible, and it will be a great help for more community members as well. Thank you!