Cell Margins in Microsoft Word What Are They, What Are They Used For, And How To Set Them?
It's no secret that Microsoft Word is one of the most recognized word processors in the world and has even been ranked as the leading tool for easily create, modify, customize and manage digital writing .
This, especially since it is a very well equipped program to carry out these tasks, because thanks to all the versions that it has had over time, today it presents notable improvements . Which means it allows you to achieve professional level results .
So, one of the most commonly used elements in Word consists of tables that facilitate the presentation of certain content . However, many users have doubts about what cell margins are and that is why we are going to explain here about what they are and how you can configure them .
What is the difference between cell margins in Word and normal margins?
Before detailing each of the steps to set up cell margins in Word like a pro, it is crucial to know what is the difference between these borders and normal margins in text documents . Since then, many users tend to confuse one type of margin with the other and, therefore, such a configuration is completely complicated.
In this sense, we start by defining in what are the normal margins of a sheet . Thus, we specify that, are these empty spaces that can be observed between the edges of the paper and the printed area . Therefore, in this case there are top, bottom, right and left margins.
"UPDATE ✅ Want to learn more about cell margins in Microsoft Word? ⭐ ENTER HERE ⭐ and find out more about SCRATCH! ”
On the other hand, the margins of a cell refer to these cell borders and the space between them , so it is a function that allows you to customize these traits. Taking into account that a cell is defined as the element of a table which serves to introduce and organize the exposed data.
Steps to set cell margins for your Word documents like an expert
As we indicated in the previous part, in a specific way, the margins of the cells have the function of customize the appearance of each cell and the borders that exist between each of them . Thus, it is considered to be an indispensable tool to edit and adjust the tables of a writing in Word as you like.
That is why it is interesting to know the procedure to be carried out in order to be able to easily configure said margins and as an expert of this Microsoft program.
Here are the steps to follow:
- To begin, you must find and navigate to Word document that you need to customize in this way.
- After that, create your table in any part of the text you choose. To do this, go to the ribbon, click on the "Insert" tab and in the Tables group, create or draw the table you want .
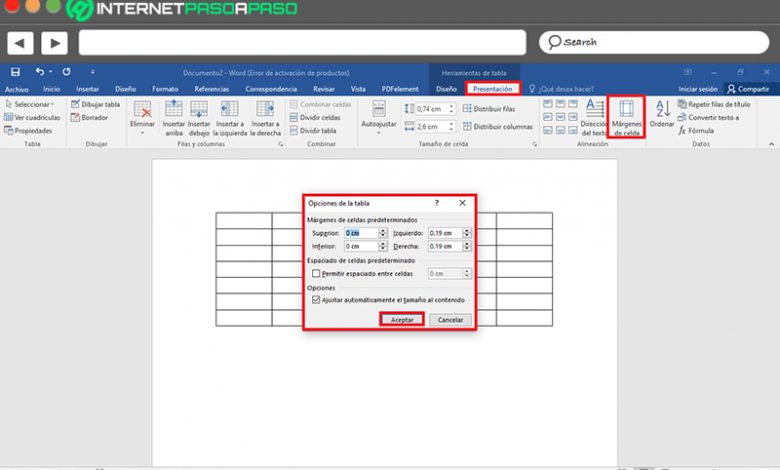
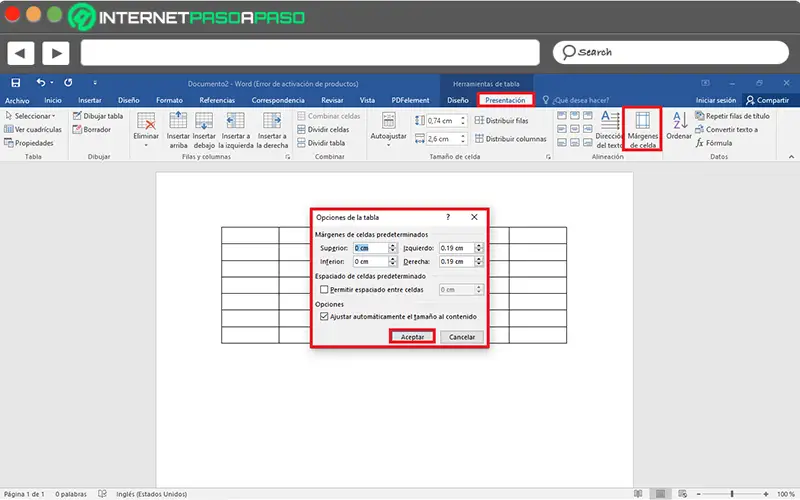
- Once done, the table tools will open automatically in the upper part of the window and in the tabs displayed with this function, click on "Presentation" .
- Then, among all the groups that exist, find the one that says "Alienation" and select the option "Cell Margins" .
- Now they will show you a small box on the screen with several options to configure , according to your needs. We present here what they are:
- The first of these refers to default cell margins and there you can specify how many centimeters you need for each box in the table, top and bottom, as well as left and right.
- You can also define a space between each of these cells and when activating the option, you must specify it in centimeters.
- If you prefer the size of your table cells is adjusted to the size of the text entered , you can also define it with the last option of the zone.
- To save the changes made and keep these settings, just click on "OK" and you are done.
If you have any questions, please leave them in the comments, we will get back to you as soon as possible, and it will be a great help for more community members as well. Thank you!