How to use and configure Windows 10 multitasking and get the most out of it? Step by step guide
Computers and electronic devices are evolving day by day. Storage capacity, connectivity, and processing speed all advance as a new model hits the market. Today, the PC allows us to perform different tasks simultaneously . This process requires the existence of tools to organize them .
The systems Microsoft operation and Windows 10 offer the possibility of control the working windows in an efficient and easy-to-view way . Although this application is provided by default, it initially seems difficult to find.
In turn, being a novelty in their products, it can also be not very intuitive . In this article, we will explain how to use the function correctly and organize your working windows in an easy way.
What is Windows 10 multitasking and what is it used for on my computer?
Multitasking mode It is a tool that allows us to organize our workspace on one or more desks. Different windows can coexist in these work tables. This feature also offers the possibility of choose size that each program will share on the screen.
Benefits of using Windows 10 in multitasking mode What are the main benefits?
If you are a multi-functional worker and use all kinds of programs in your daily work, this mode is for you. When your passion is video games and at the same time you have to put in order all your university files, multitasking can offer you a convenient way to keep all your files and shortcuts separate and organized.
If you work with your laptop and use it both in the office and at home, you can separate files working family photos and videos on different desks .
The main advantages of controlling your windows with Windows 10 multitasking are:
- You can view multiple programs at the same time. This will make it unnecessary to search for them in the taskbar.
- You can pin and categorize each program on the screen.
- If you have countless shortcuts, files, and apps on your desktop, this feature will allow you to organize them. The ability to add one or more offices will help you to separate all your links if necessary.
Steps to enable and configure multitasking to use all of its functions
Multitasking is enabled by default. However, we may have deleted your shortcut or, thanks to formatting, we have disabled this option. Then we will show you how to activate and configure correctly this good tool.
Activation
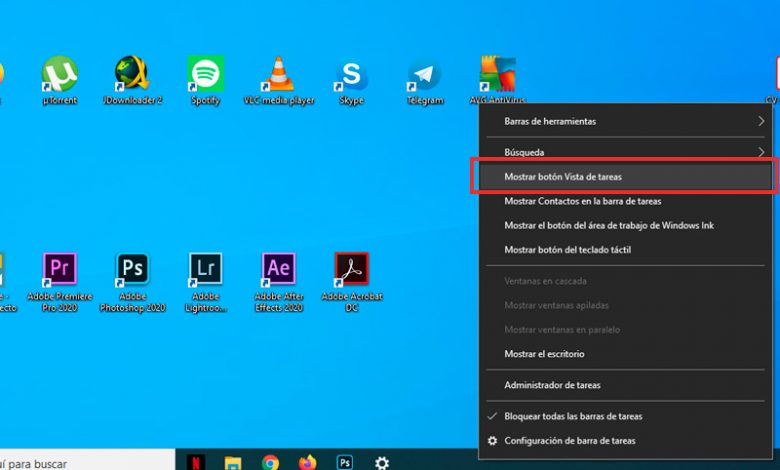
Le multitasking button or task view is almost always located to the right of the search box in the taskbar . If it's not there, chances are we'll have to activate it manually.
To do this, you need to follow the following steps:
“UPDATE ✅ Are you one of those people who like to do a little bit of everything and want to turn on Windows multitasking? ⭐ ENTER HERE ⭐ and learn how to do it »
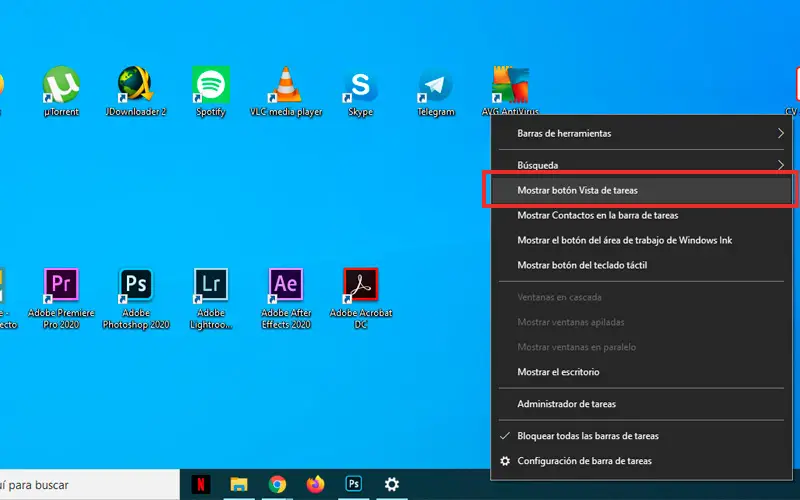
- Right-click on the taskbar which is usually located at the bottom of the screen.
- Check the View button task view button.
- Once done, you can access the view "Multitasking" to from the new icon on the taskbar or keyboard, by pressing the button "start" (usually symbolized by the Windows icon) plus the Tab key.
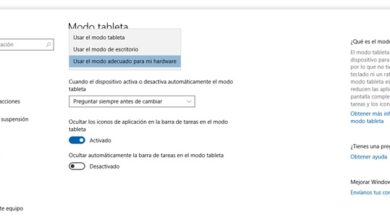
Setting
Enter the Windows menu by pressing the start button . It is located in the lower left corner of the screen or on the keyboard between the Ctrl and Alt buttons.
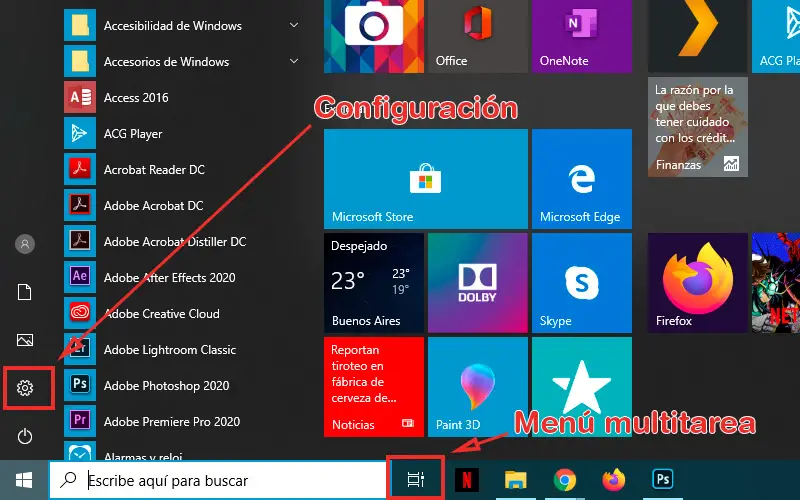
- Look for the settings icon above the power button. The first is in the form of a gear.
- A new window will open in which you will have to choose "System".
- Once there, we will choose the multitasking option found in the sidebar.
In this submenu we can configure this mode as we find it most comfortable. We'll show you which function fulfills each option:
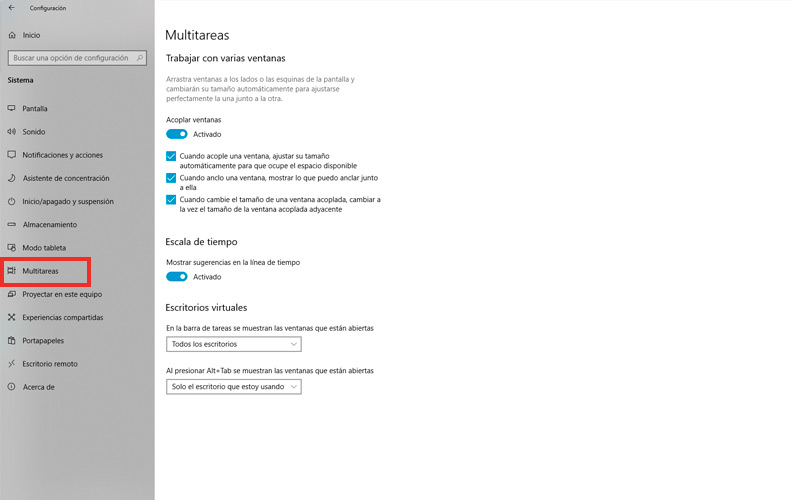
- "Dock Windows". It essentially allows the display of several windows in parallel. By activating this option, we will only have to drag a window to one edge or another of the screen and it will remain anchored.
- “When you dock a window, it automatically adjusts to take up the available space.” By activating this option, the second window that we select after having docked the first one, will adjust its size to the space available on the screen.
- “When I anchor a window, show what I can anchor next to it.” By performing the first step, the windows available to be placed in parallel will appear in the space to be occupied.
- "When resizing a docked window, resize the adjacent docked window at the same time . » With this box enabled and two windows docked in parallel, when we adjust the width of one, the other will automatically adjust to its new size.
- "Show suggestions in the timeline" this option toggles the possibility that the system shows us a history of the programs used in the multitasking menu.
The following options refer to using multiple virtual desktops. To add a new desktop, we need to enter the multitasking function and press "New office" . This will create a completely free program among the programs we have opened. This way we can organize, if we wish, the tools we use into categories.
Windows provides four ways to display programs when creating a new desktop. They are divided into two categories:
- "Open windows are displayed in the taskbar." Here we can choose whether the programs we are using on the old desktop are displayed on the new one.
- "Press Alt + Tab to view open windows." Likewise, this option allows you to switch between windows on a desktop or all.
If you have two or more monitors installed on your computer, the system considers that a single desktop is what is displayed on all screens . In other words, every monitor doesn't mean a new virtual desktop.
Try using this tool and you will see at how much easier it is to use two or more programs at the same time . Change the different options that multitasking offers, until they match the way you use Windows.
If you have any questions, please leave them in the comments, we will get back to you as soon as possible, and it will be a great help for more community members as well. Thank you!