How to customize Windows 10 to the max and give it your personal style? Step by step guide

Behind every product launched by companies like Microsoft, Apple, Android and other big companies, there are dozens or hundreds of designers working . They do this so that in this case the operating system is functional and at the same time stylish and tempting. However, there is no dislikes about likes.
This is why many operating systems offer the possibility of modifying certain visual aspects . In other words, the personalization of the elements of the interface.
There are different reasons why a person wants to change the visual of the system. For my pleasure, this might be the main one. Preferably not. But also from a practical point of view , it is more efficient to group certain programs. If we are talking about Windows, we will show you the customization possibilities.
What are all the aspects that we can customize in my Windows?
From the beginning we can say that a lot. It is one of the operating systems that allows more modifications in its interface. Of course, always within the limits set by the developer. To begin with, we will name most of the aspects that can be customized.
We invite you to comment on those which seem to you missing from the list:
- Desktop Image
- Window color
- The Start menu
- Taskbar
- Desktop icons
- Team name
- Multitasking mode
- Screen saver
- Theme
- Rainmeter Skins
- System sounds
- User Image
Steps to customize my Windows 10 desktop image
It's certain, the first change we make to the computer . If we used it as a child, the first wallpaper would have been a drawing made in Paint . Although the real fund revolution came with XP , do you remember the green hill? Here is what you need to do to change the wallpaper.
- The first method is to press the right mouse button on the background that we are going to change.
- Choose the option "Custom" . Not to be confused with "Display settings" .
- A window will open with various modifications available. To replace the previous image, press the button. "Browse" .
- Then browse through your images and select your new background.
- Press the "Choose an image" button .
- No need to touch anything else, the desktop image has already changed .
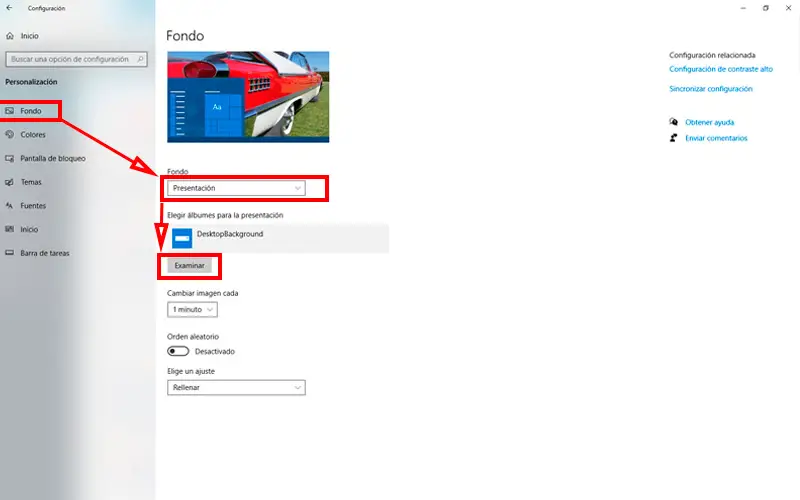
In this menu, there are other options to change the background. In the drop-down menu "Back - plan " , you can choose a very minimalist solid color. Also tell the system to change the images from time to time.
Follow this combination of actions:
- To do this, choose the option "Presentation" .
- Click on "Browse" to choose the container file for these images.
- "Choose this folder" when you have decided.
- You can decide the time interval between images.
- If you want them to appear in random order, drag the button to "Enabled" .
The second method is simpler, but without so many configuration options:
- You need to know the location of the image file.
- Once in the corresponding file, right click on the new background and select "Set as new desktop background" .
- It will immediately become the new background image.
Learn how to set up multiple desktops in Windows 10 quickly and easily
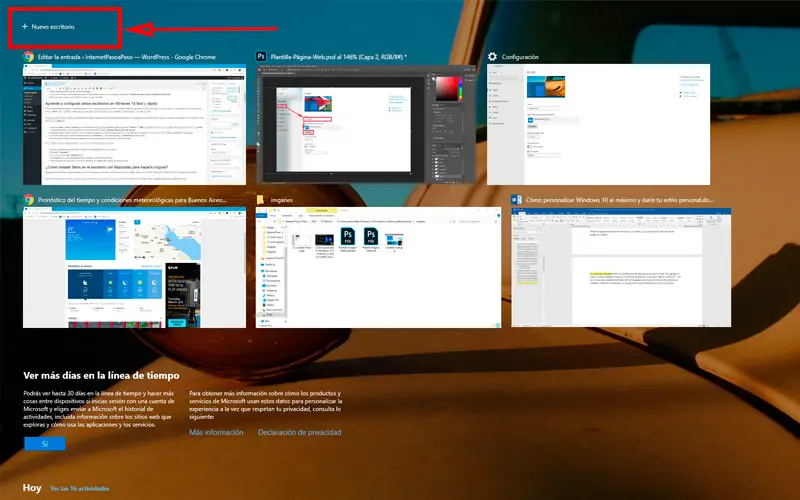
Many users tend to use more than one program at the same time. Today's computers allow this, given their capacity and power. In some cases, like in a web browser, we can open multiple windows. But at the end, we will find a task interface filled with applications and open windows .
This is why Windows 10 offers the possibility of use multiple desks where you can organize your windows. This is a new feature that few users take advantage of.
We will show you how to use and configure it:
- Accessible from multitasking mode. Which came in two ways. By pressing the buttons "Start" + "Tab" or by pressing the corresponding button in the taskbar. If you cannot view it, press the right button on the bar and choose “Show Task View button”.
- After the previous step, you can see how all open windows are organized. At one end of the screen you will find the expression "New office" . Press.
- By doing this, all the ones you had will be stored in "Desk 1" . Conversely, "Desktop 2" will be free.
- You can continue to start new programs or drag some of the already open programs to the new desktop.
To configure some options of this new option, do the following:
- Enter the settings (in the Start menu it is symbolized by a gear)
- Select "System" .
- In the sidebar, choose "Multitasking" .
- Changes for workstations are coming to an end.
- Configure these options to see how the windows you are using are displayed on each desktop.
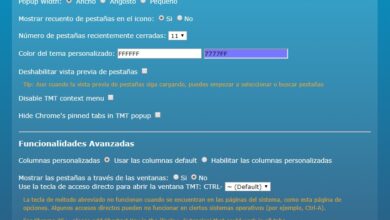
How to install Skins on the desktop with Rainmeter to make it original?
Rainmeter is a customization program desk external to Windows . It is free and open source, which makes it easy for many users to share their aesthetic.
This tool allows you to add items, besides icons, to the desktop. Each set of them ( Skins ) is called Suites . And they can be downloaded from different sites. In addition to being visually appealing , each skin performs a function, such as giving the time or displaying system information, among other things.
To have this tool and use the different skins, continue with these steps:
- Allez on rainmeter.net .
- Look for the button "Download Final" , we recommend it on "Beta" .
- When the download is complete, run the installer.
When the process is complete, the program opens automatically. The theme Illustrious is the default . You can also see that several skins already appear on your desktop. You can keep them and put them where you want them the most or deactivate them and search for others suites .
- To do this, first press the secondary mouse button on the box and select "Unload the skin" ou "Download the skin" if you are using the Spanish version. You have to repeat this operation on all the squares.
- Each skin has different options at the same time. You can find them by right clicking on any of them and selecting "Skin Manager" .
- It's time to look for another suite . Being free software, you can find topics on many pages. We recommend that you first choose one from deviantart.com/rainmeter . If you haven't, register on the site.
- When you have chosen the theme (s), tap the download icon under each swatch. As a recommendation, choose a particular file in which to save the suites .
- When the download is complete, run the file and the installation begins. When finished, you will be able to find the theme in the window "Skin Manager" .
Many of these skins collect information from the operating system itself. Such as time, space available on disks, even processor temperature . But in other cases, like those that offer the weather, it is necessary to configure it ourselves.
To do this, you will need to:
- Right click on the weather box (in this case). Choose the option "Modify the skin" .
- A text file will open. Look for the line that begins with "URL" , especially one that indicates a "# WeatherCode #". We need to replace this part with the code that matches our location.
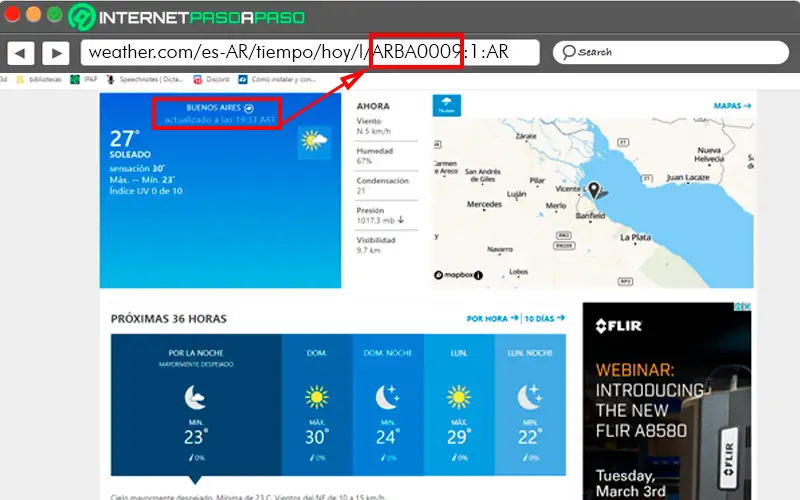
- Find this code on the site Weather.com en entering your position.
- Copy the code in the site address, and then replace the code in the text file. As the picture shows.
- Save the changes and you will have configured your Weather Skin.
Change the theme of Windows 10 to customize it easily and quickly from scratch
A theme is a collection of customizations defined by a user. We have seen how to customize certain elements. But a much faster option is to use an already created theme.
For that, proceed as following:
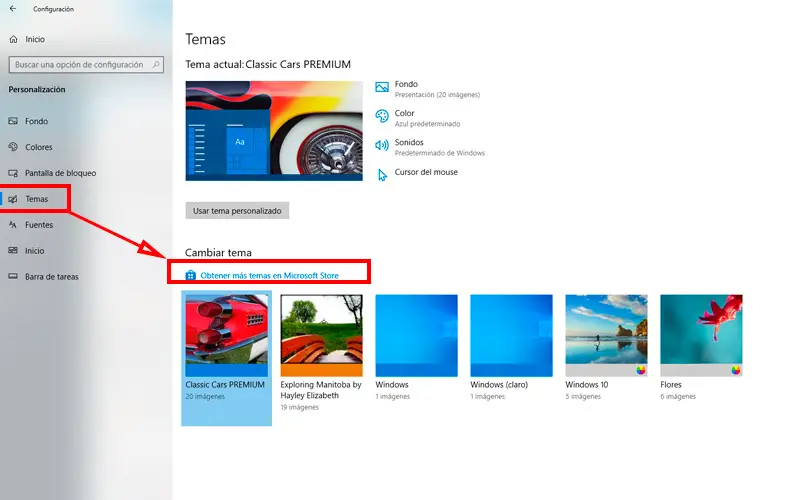
- Use the shortcut "Start" + "I" .
- From the side menu, choose "Themes" .
- You will be able to see your current theme or the default Windows theme. If you want another press "Get more themes from the Microsoft Store" .
- This will take you to the specialized tab of the store. Pick the one you like the most, most are free.
- With this you can preview the images it contains. If you are satisfied, press "Get" . The download will begin.
- At the end, it will appear in your options in the tab "Themes" . To use it, select it.
Learn how to customize the Windows 10 Start menu to give it your own style
The Start menu is the window that appears when we press the Windows icon in the taskbar . It also has its own key on the keyboard, it usually has the operating system symbol. Not long ago, Microsoft has decided to remove this menu , as we knew it before and now. In version 8 you accessed a new screen with all programs.
With its update to 8.1 it came back and is still used in 10. The design of this menu is simple and minimalist, designed to make it easier to find and organize programs. For the latter, follow these steps.
To access the menu settings, we need to enter "Personalize" by right clicking on the desktop:
- On the sidebar, choose "Start" . You will find the following possibilities in this window.
- Show more icons on Start.
- Show the application list from the Start menu.
- View recently added apps.
- Show the most most used .
- Occasionally check out suggestions in Get Started.
- Use full screen in Start (like Windows 8).
- Show recently opened items to from the shortcut lists on Start or in the taskbar or in the quick access of the file explorer.
You can enable or disable each of the above options. But it also gives us the possibility of organizing and cataloging the programs without leaving the menu:
- If you have an app that you don't use often and want to delete it because it takes up space, you need to right-click on it in the Start menu and a context menu will appear. Choose "Detach from the beginning" .
- Do the same to add a program, opting only for "Pin to Start" .
- You can change the size of each box in this menu. There are four sizes depending on the application. Large, large, medium and small.
- If you group shows, you can edit or add a name to the category. Tap the two horizontal lines above to do so.
How do I customize the taskbar on my Windows 10 computer?
Since its inception, the taskbar has been part of Microsoft's operating systems. Version 10 is no exception. Like the previous articles, this one can also be personalized.
Proceed as follows:
- To get started, we're going to change the size and location. Press the right button on the bar and turn off "Lock the taskbar" .
- You can then drag and drop it to either end of the screen. It is also possible to widen it, starting from the outer edge.
- By pressing the secondary click again, you will be able to access "Configuration of the taskbar" .
“UPDATE ✅ Do you want to learn once and for all how to personalize your Windows 10 PC in a unique way? ⭐ ENTER HERE ⭐ and find out how to do it FROM SCRATCH! ”
In this window, you can:
- Lock the taskbar .
- In desktop mode, automatically hide the taskbar.
- In tablet mode, automatically hide application icons in the taskbar.
- Use of small buttons on the taskbar.
- Use Browse to preview the desktop by moving the mouse over the Show Desktop button at the bottom of the taskbar.
- Change the command prompt to Windows PowerShell from the menu by right-clicking the Start button or pressing Windows key + X.
- Show notifications on taskbar buttons. Choose the location of the taskbar on the screen .
Find out how to make taskbar transparent in W10 step by step
A small change that will make the Windows interface even more user-friendly is to enable transparency effects. To achieve this, follow these steps:
- Press Windows key + i. The configuration menu opens.
- Select "Personalization" .
- In the sidebar, choose "Colors" .
- Activate the slider "Transparency effects" . This will make the bar semi-translucent.
If you want to make it 100% colorless, you can download the TranslucentTB program from the Microsoft Store. It is a free tool.
Find out how to customize all the icons on your desktop and other folders.
Let's start with some more in-depth customization. If you want to change the desktop icons and leave Windows with your style, follow these steps:
No program
To do this without using an external tool, you have to take the trouble to change the icons of folders and programs one by one:
- Choose the item you want to personalize. Right click on it.
- At the end of the list, click "Properties" .
- Go to the tab "Personalize" .
- Do the same with the "Change icon" button .
- A small window will open with a variety of images supplied with the system. You can choose between them. But if you want to use another one, you can download it from the internet. There are many sites that offer packages of .ICO files that will help you.
- Repeat for each item you want to personalize.
With IconPackager
It is an external tool that contains and facilitates the change of icons of the system as a whole. To carry out this process you need, in principle, said software and a theme package of your choice that you can find on the Internet:
- Once downloaded and installed, open the program.
- Go to the tab "Look & Feel" .
- Select "Add an icon package" and in this one "Install from disk ..." .
- File Explorer will open, navigate to the location of the downloaded theme and tap "To open" .
- After that, you will see said package at the bottom of the program.
- Select it and you can preview it.
- If that convinces you, click on the button "Apply the changes" at the top right of the window.
It's as easy as making changes with IconPackager.
Find out how to download and install custom cursors for your mouse
To make this change, you must first download a slider pack or pointers. Since these are very light files, many options usually come in the form of compressed files. You can find them on different websites. We recommend that you use YouTube, because you can see them before you download them.
To change standard cursors to custom cursors, follow these steps: