How to change and configure DNS in Windows 10? Step by step guide
Have you ever wondered what is done on your computer each time you enter an e-mail address into your browser and are returned to that online space as a result? The fundamental factor that you can see on this website is the use of DNS or Domain Name System .
In addition, the concept becomes very important to be able to control a user's browsing territory, so that they are preconfigured in your router and DDoS can be avoided. The government also controls the external domain name system so that some web pages cannot be entered, which you can ignore by modifying these DNS, which we teach you to do from this article .
If you need to change these addresses and thus be able to control access or not to certain websites, be aware that even less expert users can do this; it's something very simple. Even so, in the next lines we will give you all the steps in detail, to be able to configure DNS in Windows 10.
Steps to change DNS in Windows 10 and configure them correctly
These steps which will be shown in the following lines will make you switch between some complex concepts, but if you have Windows 10 as an operating system on your computer and a bit of an urge to learn, it doesn't have to be complicated. . Any user can follow the tutorial and modify the domain name systems to which it connects:
- From the home screen; Push the button "Start" on the keyboard or click on its icon in the start bar.
- Then click on the menu "Settings" , with cogwheel icon.
- A menu with several options will appear at the bottom. Open "Network and Internet" , section relating to the characteristics of your Internet connections.
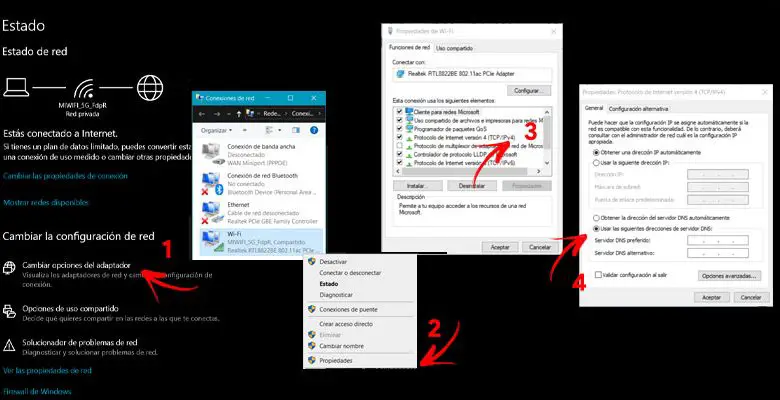
- Select "Change adapter options" .
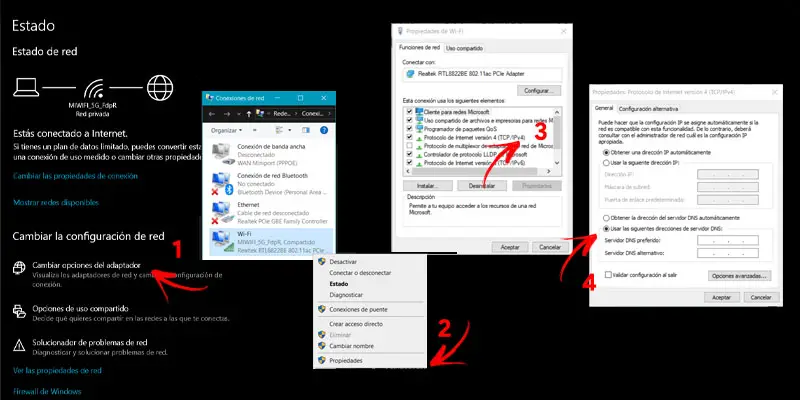
- The next step will be determined by how your computer is configured on the Internet. In the next window you will find different methods of connecting to the network. If you are using a connection cable, you will see an option called "Ethernet" . Click on it.
- Otherwise, if your computer is not using cables and you are connecting to the wireless network, you need to tap on the option "Wifi" with a double click.
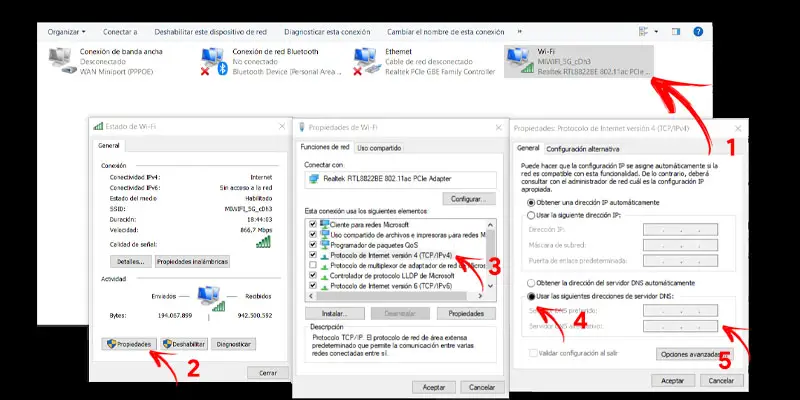
- Now click on the button "Properties" at the bottom of the little window full of options that opens.
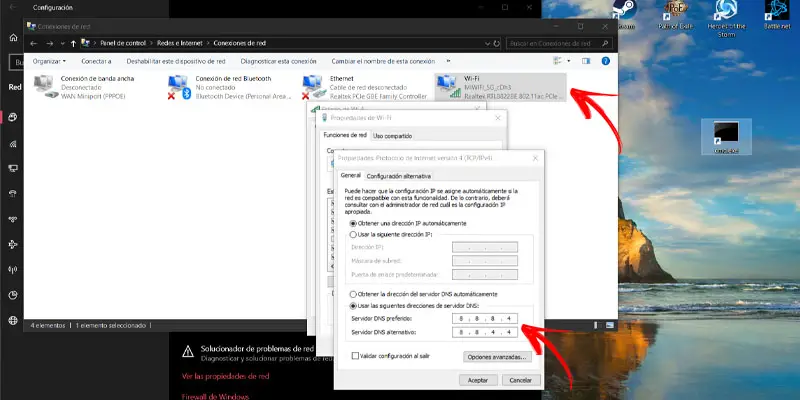
- Look for the option "Internet Protocol Version 4 (TCP / IPv4)" . Double click on it.
- From all the new options below, choose "Properties" .
- Once inside this menu, we will only have to choose the option "Use the following DNS server address" . It is likely that you have previously checked the option "Obtain DNS server address automatically", because it is the one that comes by default in the system itself. But by activating the option we have indicated, a Preferred DNS and an Alternate DNS will be disabled.
- Fill in now spaces with dots with the numeric addresses of the DNS of your interest .
- Finish by pressing «OK» .
- You should reconnect to the network for the changes to take effect.
List of operational public DNS servers
Of course, we're not going to leave you with the perfect instructions and no resources to use. Below is a complete list of addresses for public domain name servers that you can connect to.
“UPDATE ✅ Do you want to know how to configure DNS server change in your Windows 10 operating system? ⭐ ENTER HERE ⭐ and find out how to do it ✅ EASY and QUICK ✅ »
List of the best DNS servers with their addresses:
- Alternate DNS : 198.101.242.72 / 23.253.163.53
- Clean Browsing : 185.228.168.9 / 185.228.169.9
- Cloudflare : 1.1.1.1 / 1.0.0.1
- Comodo secure DNS : 8.26.56.26 / 8.20.247.20
- DNS Advantage : 156.154.70.1 / 156.154.71.1
- DNS : 77.88.8.8 / 77.88.8.1
- Man : 216.146.35.35 / 216.146.36.36
- Fourth State : 45.77.165.194
- FreeDNS : 37.235.1.174 / 37.235.1.177
- Google : 8.8.8.8 / 8.8.4.4
- GreenTeamDNS : 81.218.119.11 / 209.88.198.133
- Electric hurricane : 74.82.42.42
- IBM Quad9 : 9.9.9.9
- Level3 : 209.244.0.3 / 209.244.0.4
- Neustar : 156.154.70.1 / 156.154.71.1
- Norton ConnectSafe : 199.85.126.10 / 199.85.127.10
- OpenDNS Home : 208.67.222.222 / 208.67.220.220
- OpenNIC : 50.116.23.211 / 107.170.95.180
- puntCAT : 109.69.8.51
- SafeDNS : 195.46.39.39 / 195.46.39.40
- SmartViper : 208.76.50.50 / 208.76.51.51
- DNS uncensored : 91.239.100.100 / 89.233.43.71
- Verisign : 64.6.64.6 / 64.6.65.6
- SMART : 84.200.69.80 / 84.200.70.40
How to fix DNS when you are unresponsive in Windows 10?
While configuring DNS you may get the problem " DNS server is not responding ». You will see how you are unable to connect to the internet and you cannot perform the tasks that you need. Well what can we do in this case?
Read on to resolve this issue, which is nothing more than a simple repair:
- Press the "start" button .
- Type now "Control Panel" on the bar.
- Click on the option of the same name which is recommended.
- Here click on "Networks and Internet" .
- Now do the same in the option "Network and Sharing Center" .
- Once there, we choose the option "Change adapter settings" .
- Right- click on the network card that we use on our computer.
- Among the possible options we mark "Properties" .
- We are looking for the line "Internet Protocol Version 4" and select it.
- Also check its "Properties" .
- Entrez the following DNS:
- 8.8.8.4 or 208.67.222.222
- 8.8.4.4 or 208.67.220.220
- Click on the "Validate the configuration on exit" box , which allows us to validate the new configuration before closing the menu.
The configuration can also be fixed by performing a DNS reset through the command prompt. This can be of interest to more expert users, although it is also very easy to do.
We will see it:
- You will open, via an executable, a system console. For it:
- I let's type "cmd" in the "Start" bar.
- Now click on "Command Prompt" .
- When the black screen opens, we let's introduce the following instructions each followed by an "Enter":
- ipconfig / flushdns
- ipconfig/registerdns
- ipconfig/release
- ipconfig / renew
- Resetting Netsh Winsock
With this, you would have solved the problem and you could perform your internet browsing normally.
If you have any questions, please leave them in the comments, we will get back to you as soon as possible, and it will be a great help for more community members as well. Thank you!