Connect your USB printer to the network with a print server
Although today most of the printers that we can buy new are already ready to connect to the Internet, both wired and Wi-Fi, if we have a somewhat old printer, it is possible that it still does not have this function. This way, if for some reason we want to connect the printer to the local network, for example to share it with more computers, we will have to buy a new one, depend on a print server or, if we have a Raspberry Pi handy, take the opportunity to connect our old USB printer to the local network without making more investment.
To do this, all we will need is a Raspberry Pi fully functional (i.e. with its SD card with Raspbian installed and a network cable, or a Wi-Fi adapter (if you don't already have it)) and the USB Printer that we want to connect to our local network. If we want to control the Raspberry remotely via SSH we won't need anything else, although if we want to manage it locally we will need, at least, a keyboard to enter commands and a screen where to connect it.
Once everything is ready, we start with the installation and configuration process.
Install the print server or print server in Linux
As we said, we start with a relatively modern version of raspbian, the official operating system of the Raspberry Pi, which is a Linux-based operating system. Once that works, the first thing we'll do is update the system repositories with the following commands:
- sudo apt-get update
- sudo apt-get upgrade
Once updated we will install the server CUPS while typing :
- sudo apt-get install cups
It should not be long before the automatic installation and configuration of the tool. When done, the following will be to add the user "pi" to the lpadmin group to be able to use CUPS without having to depend on root:
- sudo usermod -a -G lpadmin pi
We also need to configure CUPS to allow any connection from our network with the command:
- sudo cupsctl - remote-all
Ready, we just have to restart the print server for the changes to take effect with:
- sudo /etc/init.d/cups restart
We have everything ready. To test that everything is working, all you have to do is enter the IP of our Raspberry Pi in our browser (which, if you don't know it, you can get it with the "hostname -I" command) followed by port 631 of similar way to the following:
- http://192.168.1.100:631
If you want to be able to use the printer from Windows, you still have to configure SAMBA on the Raspberry Pi so that it can communicate with the Microsoft system without any problem.
How to install and configure SAMBA on the CUPS server
To install SAMBA, we will simply type in our terminal:
- sudo apt-get install samba
Once the installation is complete, we open its configuration file by typing:
- sudo nano /etc/samba/smb.conf
And we move down where we'll see two different sections, one for [printers] and another for [print $]. Now we are going to configure these two sections to match the following configuration:
# CUPS printing.

[printers]
comment = All Printers

browseable = no

path = /var/spool/samba

printable = yes

guest ok = yes

read only = yes

create mask = 0700
# Windows clients look for this share name as a source of downloadable

# printer drivers

[print$]
comment = Printer Drivers

path = /var/lib/samba/printers

browseable = yes

read only = no

guest ok = no
We restart our SAMBA server with "sudo /etc/init.d/samba restart" and everything will work.
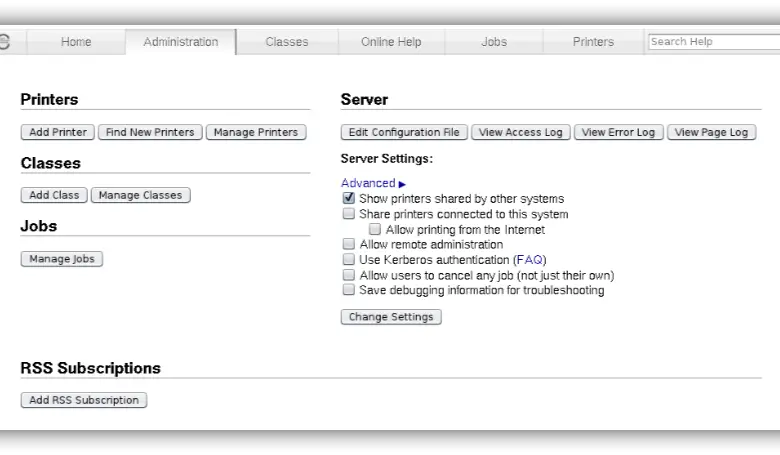
How to add printers to the Raspberry Pi CUPS server
It only remains to add the printer to the CUPS server so that we can connect to it through SAMBA. To do this, we simply enter the IP of the Raspberry Pi in our web browser followed by port 631 as we said previously and in the configuration that appears we will switch to the tab "Administration".
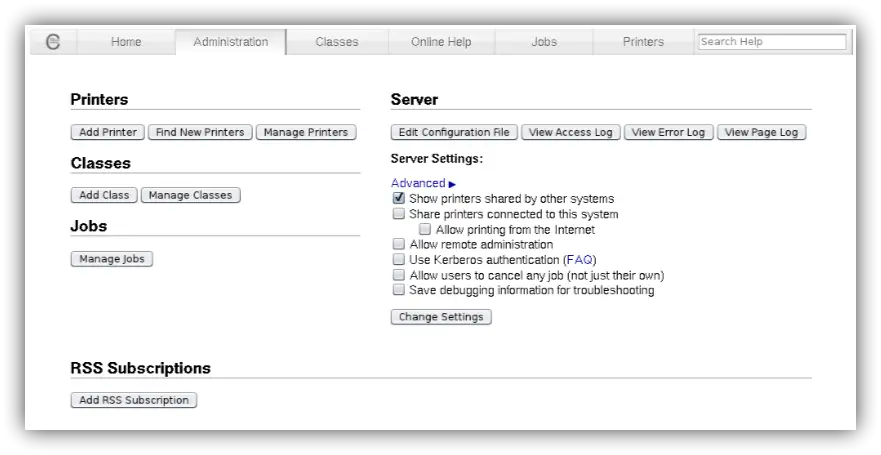
In it, we will click on the button " Add a printer ”And we will select the printer that will appear as“ Local ”, since it will be the one that is connected via the USB port.
El propio CUPS intentará elegir el controlador adecuado de forma automática (si no, tendremos que elegirlo nosotros de la lista que nos aparecerá) y, antes de finalizar, debemos asegurarnos de marcar el botón " Share This Printer »To compartmentalize the impresora across the web.
All ready. Now, if from a Windows computer we search for printers available on the local network, we will see how this new printer appears to us. We add it to our operating system and we can print with it through the local network as if it were a new printer with Wi-Fi or a network printer.