How to set up a homegroup on your Windows 7 computer? Step by step guide

The best way to share files with different devices located in the same location is through the domestic group or home group . If you want to know how to set up a homegroup on your Windows 7 computer , keep reading this practical step by step guide .
previously, specific server programs or systems were necessary to establish a connection between various devices. Nowadays it is enough to make a slight configuration to establish a home network .
Homegroup is a very handy feature available in Windows 7, Windows 8.1 and Windows 10 . Know all the information about this subject!
What is a homegroup and what is this type of network for in Windows 7?
When you want to play a movie that is on your computer through your laptop, you can take advantage of the benefits offered by the Residential Group . That's why it's worth knowing what a homegroup is and what is this type of network for in Windows 7. The residential group, also called Residential Group , is a method by which you can set up a home network .
Thanks to the Residential Group , all connected devices will be able to share files between them and use the printer. For example, you can use the Residential Group to send documents, images, videos or any other file to the rest of the computers belonging to the home network in your environment .
In addition, the residential group is a safe environment because you can ensure security by entering a password . In this way, no foreign computer will be able to connect to the network. Password can be changed at any time . Likewise, you can also select the files you want to share and those you don't want . However, at any time, you can change these settings as needed.
What are the advantages of creating a home group?
Often the users need to share resources and information across multiple personal computers . Le Residential Group greatly simplifies the process.
"UPDATE ✅ Do you want to correctly configure a home group network in your Windows 7?" ⭐ ENTER HERE ⭐ and learn how from SCRATCH! ”
However, we show you the other advantages of setting up a homegroup:
- Easy access to shared resources: via the home group, you can view any type of file configured on the network . For example, you can view the images of your computer from the laptop, as long as it is part of the home network.
- Connectivity always available: the internet connection will be always available for all devices in the home group.
- Supervised activity: Thanks to the residential group, you have the possibility of monitor the interactions of all devices connected to the home network . This can be seen reflected in the configuration of the router.
- Device management: Finally, the residential group offers you the possibility to remotely manage all the computers connected to the network .
Learn step by step how to properly set up a Homegroup in Windows 7
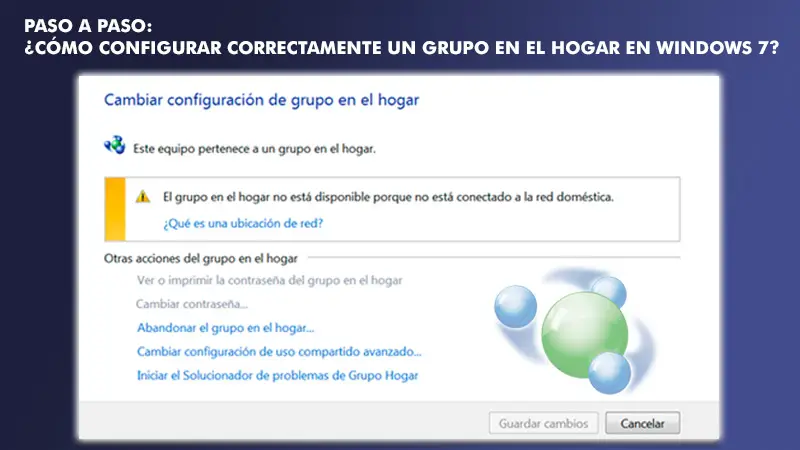
The process of creating a homegroup is quite simple . Please note that the steps to follow may vary depending on the Windows version . However, this time we will explain step by step how to correctly configure a homegroup in Windows 7 . There are some aspects to take into account before creating a household group in your house. When you configure your computer with Windows 7 , a residential group is automatically created on the computer . In case there is already one, you can join it.
It must also be known that all computers connected to the home network must have the operating system Windows 7 to be able to share files between them. Finally, it is essential that for the Homegroup to function properly, all computers have the Internet protocol version 6 (Ipv6) enabled.
To do this, we will see the steps to follow below:
Create a homegroup
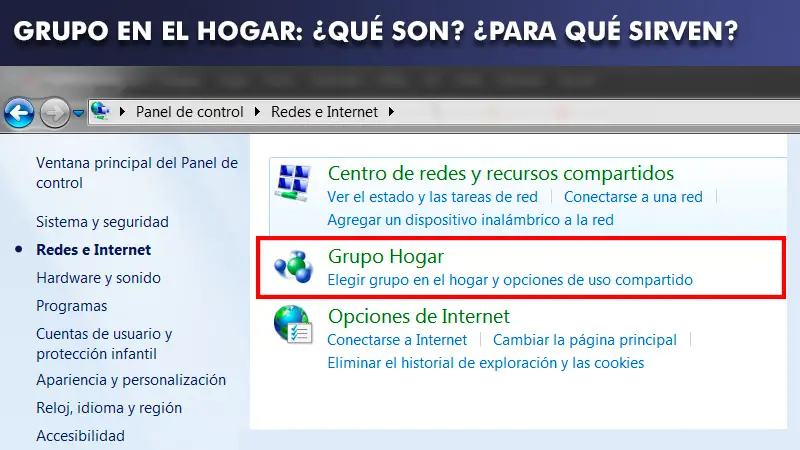
- Click on the start button . Then go to the " Control Panel » .
- Type in the search bar, located in the upper right corner, the term " Host group " .
- On the other hand, you can also click on "Networks and Internet" . On the next screen, the option "Host group" appears . Click on it.
- At the bottom of the screen, select "Create a residential group".
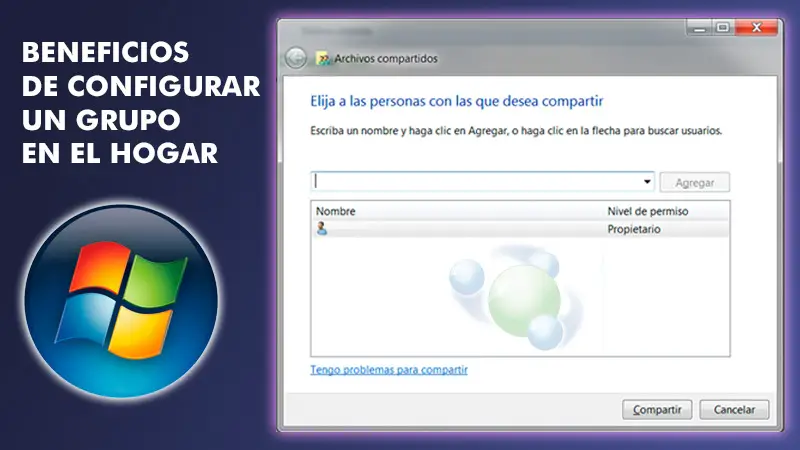
- In the section "Create a residential group" , you need to select the files you want to share with other computers. To do this, check the boxes you deem necessary .
- Then click "Following" . The system generates a password that you can use to provide network access to other devices . Write it.
- the homegroup will be created .
As mentioned above, in case a home network already exists , you will be asked if you want join this residential group. Keep in mind that if your computer is part of a domain, you cannot create a new group. You only have the possibility to register. However, you are only allowed to access files and resources that other computers share on the network , but you cannot share your documents through Homegroup.
Join a group at home
- Click on the start button. Then, access the control panel .
- Go to section Home Group . You can do this from the search bar or from the section "Networks and Internet" .
- At the bottom of the screen, where the button "Create a residential group" appeared previously, the button "Join now" appears . Tap on it and follow the instructions.
- You should enter the word de spends Residential Group to complete the process. In this way, your computer will be connected to the home network.
Access group files
- Click on the button Start et click on the name by user of the session you are currently using.
- In the left panel, click the button Home Group . Then select the user who own the files which you want to access .
- A list of all available libraries and files is displayed . Choose the one you need.
You must keep in mind that if the other computers are turned off or in hibernation mode, their users will not appear in the navigation pane .
Avoid sharing a library
- Open the homegroup at from the control panel.
- Later, uncheck all library boxes that you don't want to continue sharing with the rest of the computers.
- Click on "Save Changes" to complete the process.
If you have any questions, please leave them in the comments, we will get back to you as soon as possible, and it will be a great help for more community members as well. Thank you!