How to create and configure a Facebook Messenger Kids account?
Welcome to the new! In case you didn't know, the social network Facebook has a version intended for children under 13 years old. In this way, parents will be able to monitor their children's activity on this platform to keep them away from malicious people who want to reach them. Here we will show you how to create and configure a Facebook Messenger Kids account .
Steps to follow to create a Facebook Kids account
In this first section, we will briefly tell you about the whole process that you need to go through to learn how to create a Facebook Kids account for the youngest members of the household. As you can see, it will not take much time, because the procedure to be done is quite simple.
- To get started, you need to go to the app store of your child's mobile device to download Messenger Kids. We remind you that this application can be downloaded from the App Store, Amazon Appstore or Google Play Store, and that the latter can be downloaded on any mobile .
- After the download and installation process is complete, you need to click on the app icon and click on the button that says "Following"
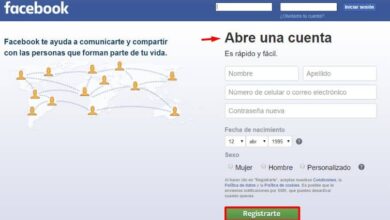
- In this step, you need to enter the data to login with your Facebook account and then tap on the “Authorize device” option.
- Now you have to write your child's name in the corresponding field and press the option "Carry on"
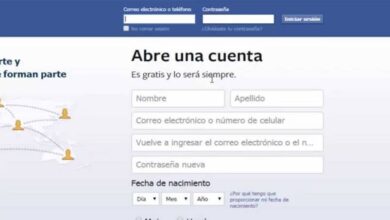
- Then you need to select the option "Create an account" and enter your child's information to create an account.
- Once you are done filling out the fields with your child's data, accept permissions for posts, photos, videos, camera, and microphone. We recommend that you update your Facebook Messenger application so that this process is also quick and easy to do.
- All that's left is to configure some final details of the Facebook Kids account , but don't worry, since we'll explain it to you in the next section.
Facebook Kids account settings
In this case, your child will take care of personalizing their profile as they wish. The first thing to do is to choose a profile picture , then customize the color of the application and change the language from English to Spanish.
At the end you will receive a notification on your account Facebook which will allow you to access your child's account. After a few days, it won't be necessary to click on this notification to take a look at the account we just created. We can access it from the app or the desktop version quickly and easily.
If you are in the app you need to press the hamburger shaped button and then select the option that says " Messenger Kids «.
On the other hand, if you enter Facebook from your computer, you must click on the option " Explore Which is located on the left side of the screen. Then, you just have to click on the “Messenger Kids” option to manage your child's account.

Once the profile is entered, you can add new contacts . Actually, this app makes suggestions about friends or family who also have a profile in this app.
Once you decide to add someone new, a request will be sent to them and they will need to be accepted by their parents. If you accidentally sent someone a request, you can easily undo that action. However, you can also send a message to someone who is not your friend on Facebook Messenger.
Once you are done setting up the profile, our children can use Messenger Kids chat to talk with their friends in their free time. Fortunately, this app has a simple interface, so the little ones around the house will be able to master it in no time.
On the other hand, so that parents can be calm, this app has options to report people who bully our children. We may also report offensive or inappropriate messages. Last resort, we can have block people who have bad behavior with our children.
That's all for today! If this information has been useful to you, consider sharing it with all your friends who have children so that they learn how to use this app properly. See you in the next post!