How to put the chat on a live Twitch with OBS Studio
In this article, we are going to cover a point of great importance for those who immerse themselves in the fabulous world of live video games on a daily basis. This is the current popularity of this type of page and in particular of Twitch , where you can do live broadcasts and also share live with your followers. That's why below we'll show you how put the chat on a live Twitch using OBS Studio.
Is one of the important aspects when you go stream and stream on Twitch is the opportunity that you need to be able to interact live from the chat window. But all those who have started to venture in this modality, do not know how put the chat on a live Twitch using OBS Studio and that is the purpose of this article.
Like everything in life, when you start to make new projects and you don't know how to go about it and use the right tool. It might sound difficult and complicated, but once you learn what to do, everything lights up and you step out of the dark. The same happened to you when you started to create streaming so that you could monetize and so earn money as an affiliate .
How to put the chat on a live Twitch with OBS Studio
Now, to begin with, we must know that it is necessary to have certain tools in order to be able to fulfill our mission. The first of these tools is the plugin OBS Studio , with which we can add Twitch chat to our videos. This of course by means of a URL or a link.
To get this plugin we can install it or we look in the sources of our Twitch account and we'll know if it's available to use it. The other tool that we will need is StreamLabs and for that we are going to go to its official page and login with our Twitch account, activate the Alerts Twitch , then connect to StreamLabs.
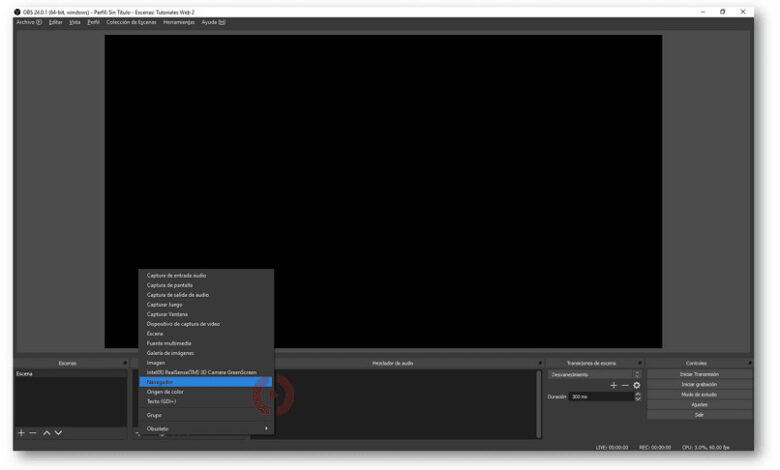
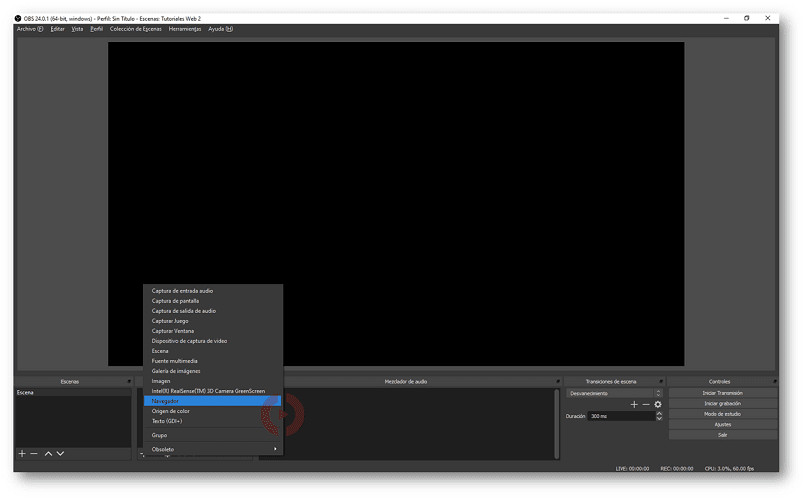
Authorization may be requested from us, if so, you confirm it and you can now make the necessary adjustments in the Twitch chat. To do this, we do not go not in the left part of the browser Chatbox Widget . We are now going to find a URL in the URL field of the widget and copy it. The next step is to go to OBS Studio and choose the scene we are going to place the cat in.
Steps to put the chat on a live Twitch
A new source must be added which is of type Browse Source , a name will also be placed on this source. Now the URL we copied earlier should be copied and then the changes are saved. After this action, a box with a red border will appear, now you have to from the Twitch chat, send messages to confirm that everything is working fine.
It is now possible that Twitch chat is displayed in your transmissions , and we can configure its appearance to our liking. The parameters that will be displayed and that you can adjust are as follows. If we want to change the theme which is displayed by default and this is where the messages are displayed, we will choose the Themes option.
Now if you want to show everyone what kind of user you are eg subscriber, moderator, turbo, twitch prime, bits. Then you need to choose Badges option, you can also hide user type from here. You can change the font color by selecting Background, if you want to add emoticons, select the Additional emoticons option.
Another option that you can configure is the font color of the messages and for that you have to choose the text color. To change the size you need to select Font Size, the option Hide chats is ideal for masking characters. In order to hide messages that have been in progress for a while, you can use the Hide message after option.
Another option that helps you hide characters but these are set, you need to choose Mute Chatters option. And finally, if you know how to work with HTML/CSS, you can personalize your chat without any problem with the Enable Personalization option. Once the changes have been made and for them to be saved, you must click on the Save settings option.