How to change screen timeout or sleep time in Windows
It is important to note that the suspend option in Windows takes care of save all open work , programs, program status among other options in RAM memory, RAM. RAM memory is therefore fast memory, so that when the computer is suspended everything is saved in it and when the computer is turned on again, all information is quickly retrieved.
Emphasizing that the computer must be connected to electric current and in case of having a laptop, it must have a battery. Since it is necessary to administer the electric current to the memory so that it can maintain the state. Because if at any time you find yourself without electricity, you can erase everything, then the suspension saves everything but continues to consume a little energy.
On the other hand, we must keep in mind that with Windows 10, we can turn off the computer screen without having to suspend as well as it is possible to activate or deactivate the suspension . Therefore, below we will tell you how change le standby time of the screen.
Easily change screen sleep time in Windows 10
First of all, it should be noted that the suspension time becomes uncomfortable for some users because they do not know how to change it. For this reason, we will explain the steps to change it below.

First of all you need to enter the computer and on the desktop you need to right click to open a small window where you will find several options, among which are "Personalization" stands out, on which you need to click.
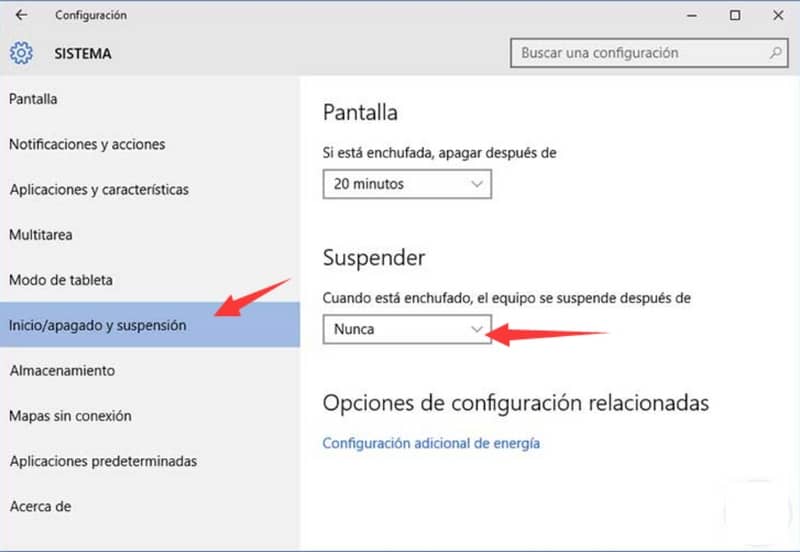
Once the new window opens, click on "lock Screen" located in the left panel. Then in the options it contains, find the "Screen standby settings" .
In it, the screen stop time and screen hang time will be displayed, in which you have to choose the time preferred by the user or if you prefer, you can select "never" to avoid the boredom of the suspension. When you do the procedure you can exit this screen and close the setup, so that when you are back on the desktop you can right click again and this time you click "update" .
Then you can enter the previous customization option to check if the process was established and executed correctly.
Steps to change timeout in Windows 7, Windows 8, and 8.1
It should be noted that the following procedure can be performed to change Windows 8, 8.1 and 7 system shutdown and suspend time. First of all, for devices with Windows 8 and 8.1 systems, the "configuration" option is sought. Once you enter, click "Modify the configuration of the PC" , so when you are in the configuration, the first option is selected, which is "PC and devices".
Similarly, when the new window opens, click on the section "Start / stop and suspend" , then the hanging and screen alternatives can be viewed. In this place you have to choose the preference option, the minutes you want or choose the option "never".
On the other hand, if you have the Windows 7 system, you can click on "start". This way you will be able to locate the option "Control panel" in the right menu, that you need to open and locate "system and security". Once you open it you have to choose "Energy options" .
When the new window opens, the section "Choose when the screen turns off" should appear in the right menu . Later, you can configure the option "turn off the screen" and "put the computer to sleep" in which you can indicate the desired minutes.
In short, when applying the desired changes, you can save and close the window. In this way we have completed the process, taking into account that if you wish, you can turn off the screen from the taskbar and also pointing out that Windows 10 offers impressive functions.