How do I create an iCloud email account? Step by step guide
Apple devices are are widely used among the public who use mobile devices. The company founded by Steve Jobs and Steve Wozniak in 1976 was born with the aim of becoming a company at the forefront of IT, but over time it has grown into a multitude of branches and formats in the technological world until, for example, shape the most famous iPhone or iPad phones and cellphones .
Some devices that stand out for their design, functionality and performance, as well as the use of iOS, its own operating system which comes with several more than exclusive functions.Among all these exclusives that surround this system, it there is iCloud . This service pack that revolves around the cloud requires the creating an Apple ID , a user belonging to the company's account system, and in turn ensures that all those who register have an electronic account. -Own email, an @ icloud.com account .
In this text that we bring to you, we will explain to you how to create an Icloud email account on your iPhone. Not only that, we will also help you so that you know all the necessary steps when setting up and syncing on different devices. At present, it is common to renew the terminal from time to time, switching from Apple to Android or vice versa.
Register an email account on iCloud @ icloud.com
3-step guide to using the tool
- Step 1: select your mobile device model
- Step 2: Enter your IMEI number (you can find it by dialing * # # 06 on your phone )
- Step 3: Click on " Unlock now And… Done!
So that it does not cause you headaches, we explain here all the steps to follow when configuring your iCloud messaging system in one of these operating systems. You will be able to verify that this is something much simpler than it looks, albeit with a few compliance points that are mandatory for proper operation. If you want unlock completely your iCloud account, click here.
Although iCloud is a service that stands out for the number of tools that it offers to its user, in particular related to data synchronization and work in the cloud , its importance lies in its absolute necessity in case of wanting to use any Apple system. If you want to buy something in the App Store, for example, you must have previously registered an Apple ID which is usually linked to an email.
As a result, open an email account in iCloud with the end @ icloud.com is a practically mandatory step for anyone who uses a phone with the bitten apple logo, as you will now see:
1 - Apple ID registration begins
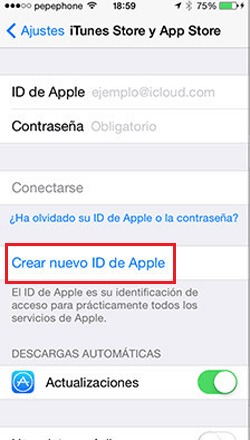
To have a iCloud account , as we mentioned, you need to start by having a Apple ID . If you don't have it, open the app iTunes Store on your smartphone . Once inside, scroll down and click on "Connection".In the menu that appears, choose "Create a new Apple ID" to be able to create it.
2 - Enter the necessary data
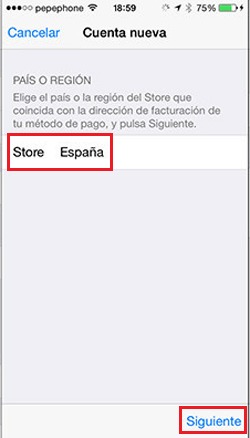
Start by choose country or region which corresponds to the billing in your payment method and, in doing so, click on " Next ». Now accept the terms and conditions of use , as well as Privacy Policy .
At this point, you must enter a series of personal data to create your Apple ID and, incidentally, your email account in iCloud . The first thing you will have to write will be, precisely, what will be the e-mail address which will be used as identifier . Remember that it must be unique and that it has never been used before.
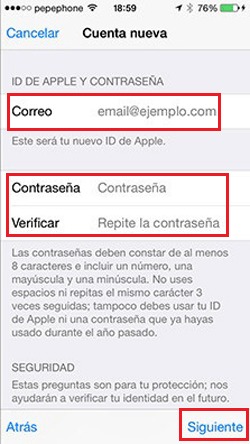
In addition, it is in this step that you can create your email account » @icloud.com «. To do this, you must click on the button "Get Free iCloud Email" when it appears and simply enter the simple information requested (e-mail address, password and verification thereof) and you will have them available.Fill in all the fields , including security questions, and continue to complete the procedure.
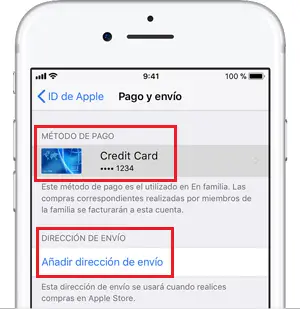
3 - Confirm the method of payment
«UPDATE ✅ Do you need another email or email account with the [email protected] and you don't know how to do it? ⭐ ENTER HERE ⭐ »
Apple will also ask you to enter the necessary data to specify your payment method , in order to use them every time you want to make a purchase in its digital store called APP Store. Enter them in the fields indicated and, once that is all done, click on " OK " To advance. Do not forget that you will not be billed , not even a test, so you don't have to worry about this step.
4 - verify your identity
Now they send a verification email to the email address you provided during the registration process. Go to your inbox and find the one sent by the Apple team. Follow the instructions given and you will have finished creating your Apple ID. Sometimes these types of verification emails end up in the spam folder, be sure to look there.
5 - Account and email created!
Once the process of creating an Apple ID terminé , you will also have completed the creating an iCloud email account . You can now start to configure this mail service to use it both on your iPhone and on other devices, because it is now compatible with more systems . In addition, you also have the option of enjoy of other cloud data storage services provided by système iCloud from Apple Lossless Audio CODEC (ALAC), .
How to set up iCloud email account?
Once you've created it, tap set up iCloud email account . Currently, considering the large section that has been generated in the mobile device market, there are two major variations to configure it. On the one hand, we have iPhone option , its native platform, or that of Android , its competitor.
In both cases, you can configure iCloud messaging , although the procedure varies by platform and operating system . Then we explain how to do it in one of them.
Configure on iPhone
It's a simple system, but it varies depending on what version of the operating system you have. If you have installed iOS 10.3 or later , you need to follow the following steps:
- First of all, go to the menu » Settings »And, once inside, look for the section "Mail" . Click on it to enter.
- Now scroll down until you find the option "Default account" . Click on it to access another new submenu.
- Once it is open, click on "ICloud" and, if necessary, enter both the email address and the linked password. When you have done it and accepted, your iCloud email will already be configured on your iPhone .
Now, in case you have the previous version because your device cannot be updated, iOS 10.2 , here are the steps you need to follow to set up messaging on your phone:
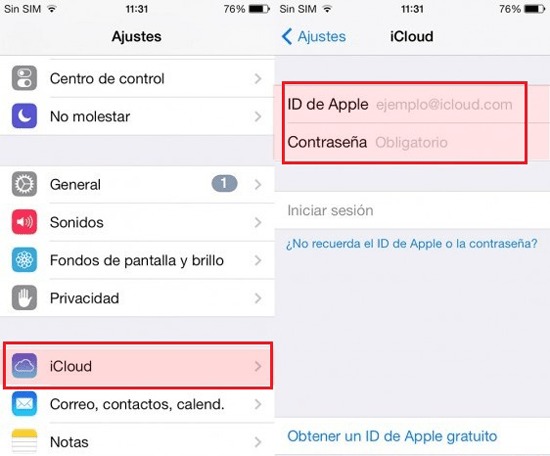
- Go to the menu » Settings » en clicking on the gear icon. Now look for the section "ICloud" and click on it to enter.
- Go to the advanced configuration section (» Advanced "), Enter it and click on "Mail".
- All you have to do is click on "ICloud account information" and, after that, on " Your email address To be able to start it in the terminal.
- It only remains to click, once again, on the email address @ icloud.com that you want to use on your Apple smartphone. Do that and you'll have iCloud Mail ready to go and sync with your phone. . You may need to enter the access password and on some occasions follow certain steps to confirm your identity (see secret questions or other procedures).
Configure on Android
On Android phones, the process is much more complex because they do not have native support for this type of email. You must follow a series of steps to be able to configure your iCloud email and synchronize it normally. Once done, it will work without any issues:
- Go to the menu » Settings «. Then click on " Accounts "> "Add an account" > " E-mail ».
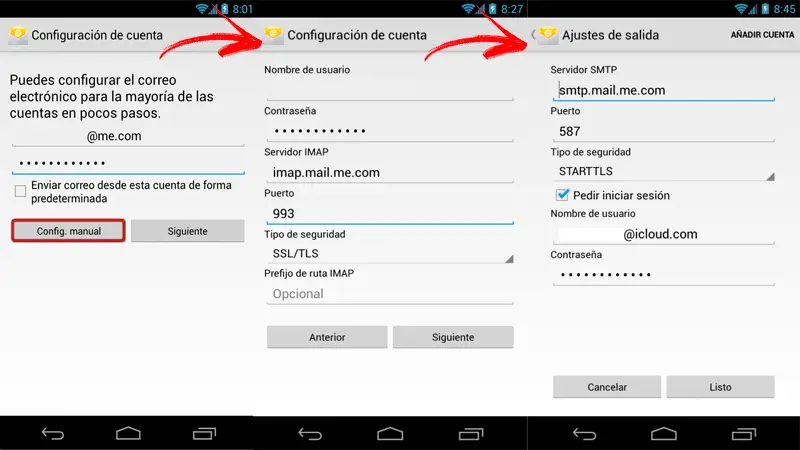
- Write your email @ icloud.com in the field " email address » and the corresponding password in the one just below. Once done, click on » Manual configuration «.
- Choose "IMAP" on the screen that appears.
- Make sure that in the field » Server " is written " imap.mail.me.com ", That the type of security is" SSL / TLS "(Or simply SSL) and that the port is 993 . If these values do not appear, enter them yourself . You will have your mail receiving server ready.
- Now you have to configure the sending mail server . To begin with, the name of it should be " smtp.mail.me.com ", Security " SSL / TLS "(Or, as before, SSL) and the port 587 . Check that this data matches what appears on your mobile and, if not, complete the fields as indicated.
After completing these 5 points and continued to accept the terms and the like, your iCloud email will now be operational on your Android phone . Despite having to configure certain parameters, you will have verified that it is not too complex, and the advantages it offers, in addition to the peace of mind of having your email everywhere, are numerous.
3-step guide to using the tool
- Step 1: select your mobile device model
- Step 2: Enter your IMEI number (you can find it by dialing * # # 06 on your phone )
- Step 3: Click on " Unlock now And… Done!
If you have any questions, please leave them in the comments, we will get back to you as soon as possible, and it will be a great help for more community members as well. Thank you!