How to fix no signal notice in Windows 10

If you have come to this article, surely you have found yourself in need of knowing how to fix No Signal warning on your Windows 10 computer screen. This is a tricky question because your computer screen is one of the main hardware components. Well, with it you can visualize all its functions. Of course, don't despair, as fixing the No Signal warning is not as onerous as other more acute errors.
Usually, this warning appears when you have not established a good connection between the display and your computer. Especially if it is a peripheral screen in the main. Often times, the problem can get complicated when you try to access the BIOS to resolve the problem, but the screen is unresponsive or letting you see it. In this article, we are going to show you the steps to fix No Signal notification.
Here are the steps on how to fix No Signal warning in Windows 10
Then, you can repair the No Signal warning that appears on the screen connected to your Windows computer by following the steps in three modules:
Try to activate the projection mode
The most common and most common is that any display or external device is automatically activated when connecting to your computer. But it also usually happens that your computer did not recognize it and that is why you need to fix the No Signal warning. Follow these steps to activate the projection mode.
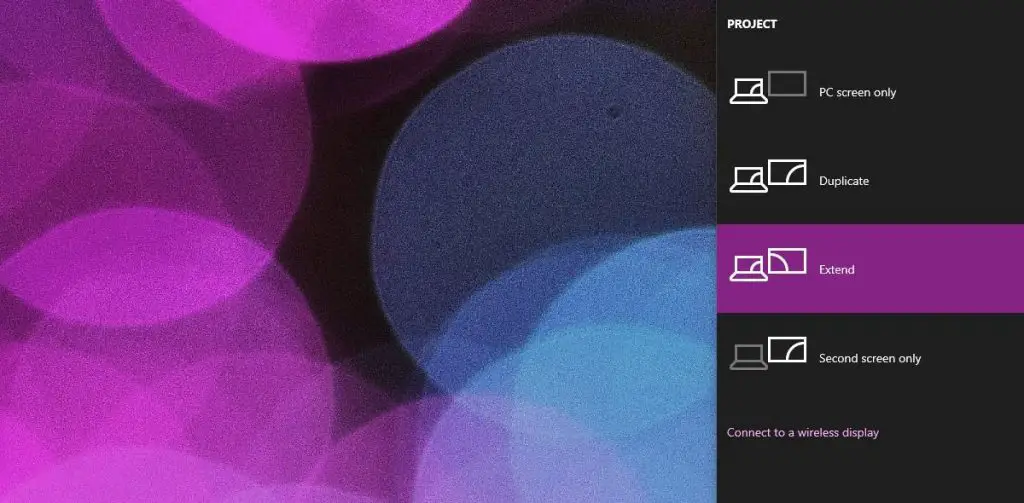
Press the combination of commands on your keyboard "Win + P". This will bring it up and you can open a panel on the right side of your screen.
Now you go to the indicated panel and click on "Extend" to display the desktop on all internal or external screens. Another way to apply is to click on “Second screen” so that you can open the screen only on the external monitor.
With these steps, you should have successfully repaired the No Signal warning on your monitor and your desktop appears. It doesn't hurt that you always keep all the files in your office organized.
Try to change monitor connection port, really effective to fix no signal warning
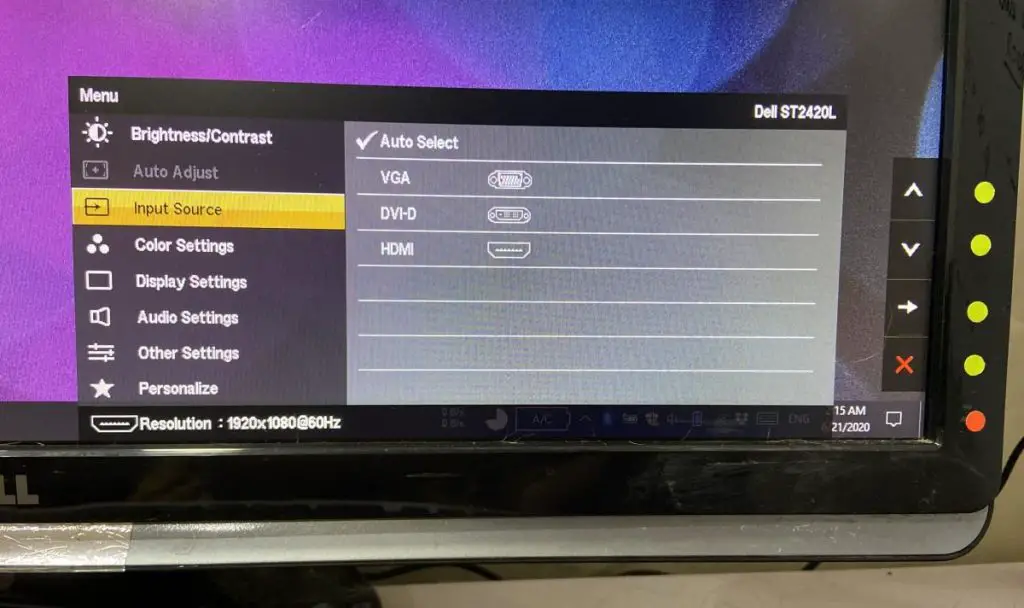
This is another quite logical solution. When your monitor does not detect the correct port, the message No signal appears on the screen viewer. Often times, your monitor will be able to immediately detect what type of port has been used to connect to your personal computer. Based on this, you should know that you have three types of ports that most monitors like yours can use to connect to Windows 10: DVI, HDMI, and VGA. Follow these steps so that you can change the port for the monitor connection.
Open the settings on your screen. Look for the buttons along the front viewfinder or on the side of the monitor so that the menu you need can appear.
Once in the menu, look for an option that allows you to select a port or entry. If that fails, choose Google for other options you can apply.
Finally, use the input selection menu to choose the port you are using and that's it, you will have your screen fixed.
Disconnect and reconnect the monitor from its connection port
This is another quite logical and simple solution. Maybe you even find that funny. Well, just by disconnecting and reconnecting (from within the operating system or manually) your monitor will be "refreshed" and the connection will be reestablished.