ProFTPd FTP Server for Linux: Installation and Configuration
Currently, there are a large number of programs that act as FTP servers. Le File Transfer Protocol (FTP) allows us to transfer files locally and remotely easily and above all very quickly. The FTP protocol by itself does not encrypt transmitted data or authentication by username and password, but if we use FTPES all traffic is encrypted from the FTP client to the FTP server . Today in RedesZone we will teach you how to install and configure in an advanced way the proFTPd FTP server, one of the most comprehensive and powerful software available for Linux operating systems. This FTP server is preferred by many system administrators for the configurability it is able to provide us. In this article, we are going to show you how to install and completely configure it on a system that is running Ubuntu so that multiple users can access it remotely.
Main features of proFTPd
The server proFTPd is compatible with all Linux and Unix based operating systems , so it is also compatible with popular FreeBSD-based operating systems which are widely used on a large scale for servers. This FTP server has a large number of configuration options, such as creation of virtual users which are only used on the FTP server and which are not part of the operating system. We can also define virtual routes for each of these users that we created previously, limit the bandwidth of the different users at the application level, and we can even define a MasqueradeAddressso that we have no problem if we use FTP PASV, which is most recommended to avoid problems in NAT environments. Other options are the possibility of create advanced rules so that from a certain network we have a series of "permissions", and from another network we have others, since we can subdivide the FTP server into classes.
The FTP protocol uses a client-server architecture, it uses TCP port 21 (which can be changed) for the control channel, where the data connection will be established, the authentication of the FTP client that connects to the server, and also the end of the data connection. The control channel depends on how we configured the FTP server, previously it was active mode which used TCP port 20 to transfer data, but this causes problems with NAT of networks. Currently the passive mode of FTP is used, where we have a range of passive ports, on the FTP server we will have to open the passive ports on the router to avoid connectivity issues.
![]()
A very important option today is encryption, both when it comes to authenticating clients that connect to the FTP server, and when it comes to transmitting all information locally and remotely. This proFTPd software includes the possibility of setting up a FTPES server , it will therefore use the TLS 1.2 or TLS 1.3 protocol so that all information from the origin (FTP client) to the destination (the FTP server itself) is encrypted and authenticated. In order to configure the proFTPd with FTPES, it will be necessary to create digital certificatesIn this tutorial, we will also teach you how to create and use them, so that all your communications with the FTPES server are secure. Thanks to this protocol, authentication and data transfer will be protected, both with TLS 1.2 and TLS 1.3 in the control channel, and with AES-256-GCM in the data channel, ideal to have an acceleration of hardware encryption and achieve high transfer speeds. If we compare the performance that we get with a processor that integrates AES-NI compared to one that does not, we are talking about performance about 10 times better, that is why it is very important that our processor integrates this technology.
Once we know the main features of proFTPd, let's see how to install this server on any Linux or Unix distribution.
Installing ProFTPd
proFTPd is very easy to install as it can be found in the software repositories of all Linux and Unix distributions, however, you can also download it from the official site to install it manually later. To install it on any Linux distribution such as Debian or Ubuntu, simply install the "proftpd" package from a terminal with the following command:
sudo apt install proftpd
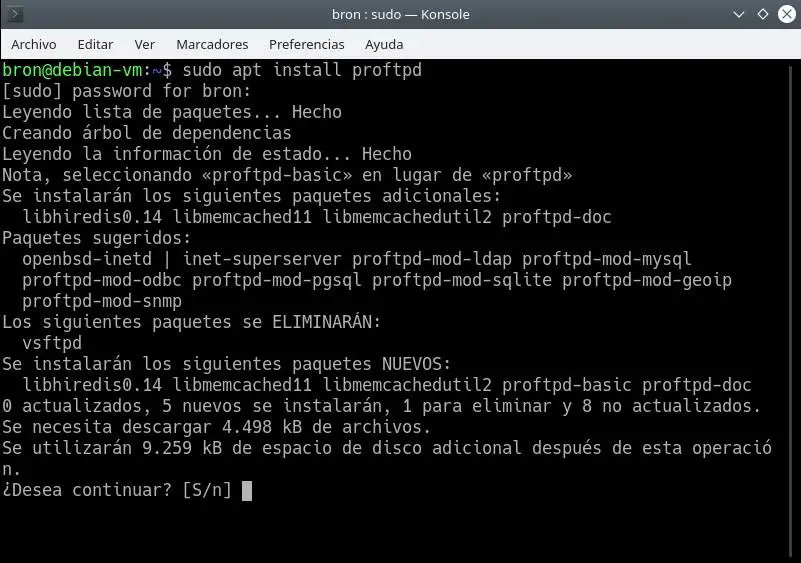
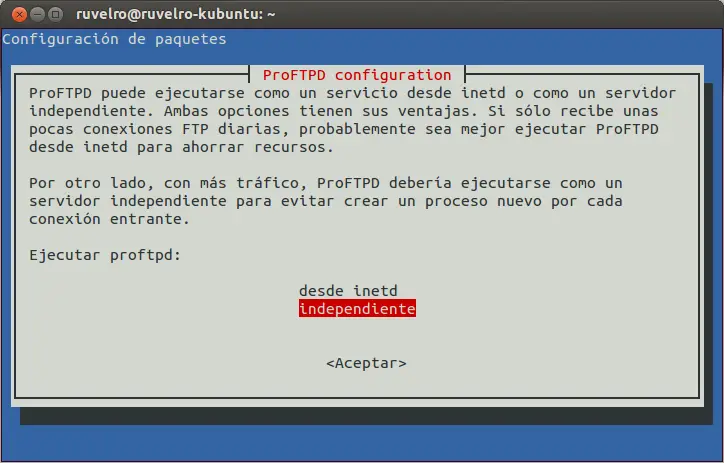
During the installation, it will ask us what type of installation we want. In case of low use of the FTP server, we can select the option " inetd To save system resources. If we are going to make extensive use of the FTP server with multiple users and for a long time, we have to install it as " standalone "Or" independently ". This configuration can be changed later, but we recommend that you select “standalone” as it will work as an independent server, and in heavy traffic, it will work better for you.
We select the option that best suits our needs and finalize the server installation. As with other programs in Linux, it will not be necessary to restart the computer or the server, we can start working with it instantly.
Start, stop, restart and reload the proFTPd process
If you need to start, stop, or restart the proFTPd process and you use typical SysVinit system , you can run the following commands to perform all actions.
To start the proFTPD server:
/etc/init.d/proftpd start
or you can also use:
service proftpd start
To stop the proFTPD server:
/etc/init.d/proftpd stop
or you can also use:
service proftpd stop
If you want to restart the proFTPd server, you can use:
/etc/init.d/proftpd restart
or you can also use:
service proftpd restart
If you need to start, stop, or restart the proFTPd process and you use systemd system , you can run the following commands to perform all actions.
To start the proFTPD server:
systemctl start proftpd
or you can also use:
systemctl start proftpd.service
To stop the proFTPD server:
systemctl stop proftpd
or you can also use:
systemctl stop proftpd.service
If you want to restart the proFTPd server, you can use:
systemctl restartproftpd
or you can also use:
systemctl restart proftpd.service
When would we need to do a "reload" to reload the proFTPd service? When we make a change to the configuration, so that it will apply it automatically. In the case of using SysVinit to do the "reload", you must put the following elements:
/etc/init.d/proftpd reload
or you can also use:
service proftpd reload
In the case of using Systemd, you must put the following:
systemctl reload proftpd
or you can also use:
systemctl reload proftpd.service
Finally, if you want to see the current status of the proFTPd server, you can run the following commands, depending on whether you are using SysVinit or Systemd, you should use the following commands. If you are using SysVinit, you will need to use:
service proftpd status
or
/etc/init.d/proftpd status
and if you are using Systemd:
systemctl status proftpd
or
systemctl status proftpd.service
Once you know how to start, stop, restore, reload configuration and see the status of proFTPd software, let's see how we can configure it with system boot.
Configure proFTPd at system startup
When we install proFTPd, we will set it up automatically on startup, that is, when the system boots up, the proFTPd process starts so that we can connect. If that doesn't happen, we can always activate it manually by running the following commands:
If you are using SysVinit:
chkconfig proftpd on
If you are using systemd:
systemctl enable proftpd
systemctl enable proftpd.service
Once we know how to start it with the system, we will see each of the proFTPd setups so that you can configure everything in detail.
ProFTPd configuration
The main proFTPd configuration file is located in /etc/proftpd/proftpd.conf . From there, we'll need to configure most aspects of our FTP server. The first thing we need to do is establish a folder as the home directory for all FTP users. To do this, we'll open the previous config file with our favorite text editor:
sudo gedit /etc/proftpd/proftpd.conf
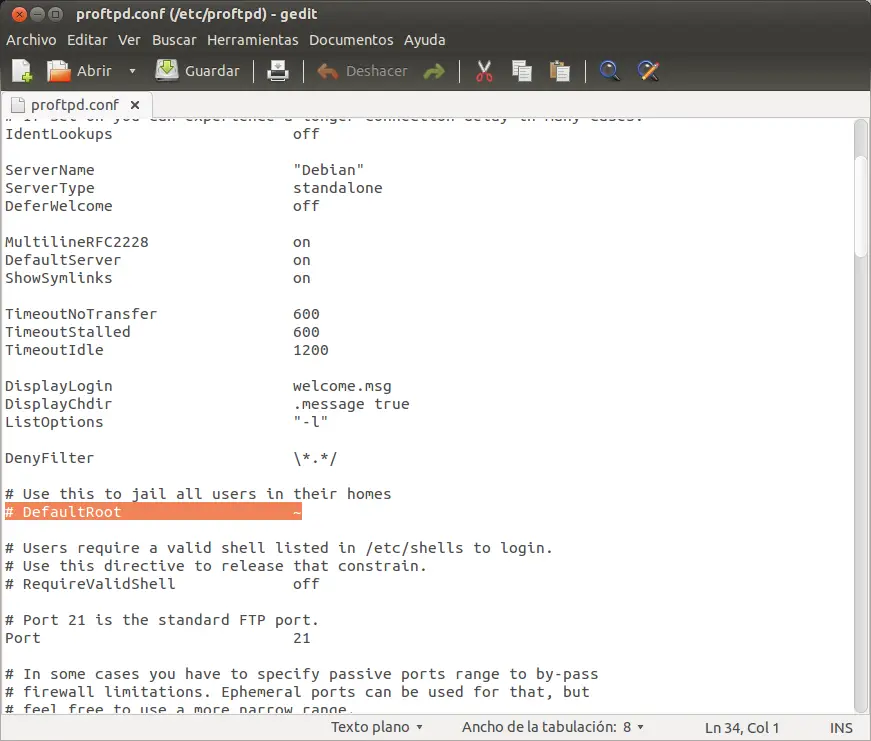
Once there, we'll look for the commented line "DefaultRoot" and uncomment it by removing the hash #. This will allow us that when each user accesses his FTP account, he directly accesses his "home" folder.
If we want all users who log in to go to the same default folder, we need to change the DefaultRoot setting and add the path we want them to go to. For example, in our case, we created a folder called “proftpd” in / home / and we want all users to access it by default. The configuration file will be as follows:
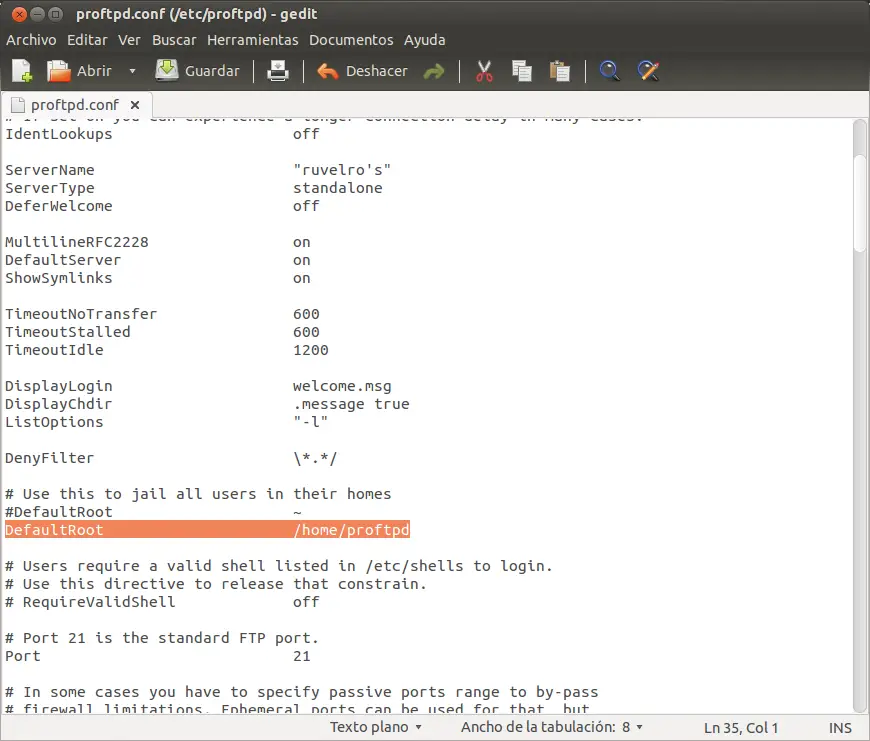
We can also make all users go to a default folder (like in the previous step) except one user we want to go to another or just have admin permission and can access the entire disk.
For this we must modify the following aspects:
The DefaultRoot parameter has the following structure:
DefaultRoot [directorio] [grupo de usuarios que tendrán ese directorio por defecto] [Grupo de usuarios a los que no se les aplicará ese directorio]
That is to say that we are going to give the example of having 2 users, A and B. A will only be able to access his directory while B will be able to access the entire hard drive. The following lines must be added:
DefaultRoot /home/ftp A
DefaultRoot / B
This way, when user B accesses the server, he will have full control over all the files on the disk, whereas if A is accessing, he will only be able to manage his folder.
Other interesting parameters to configure are:
- ServerName: allows you to establish a name for the server.
- AccessGrantMsg: welcome message. (You must add it manually at the end of the file).
- AccessDenyMsg: Error message on startup. (You must add it manually at the end of the file).
Next, we will restart the server for the changes made to take effect by typing:
sudo /etc/init.d/proftpd restart
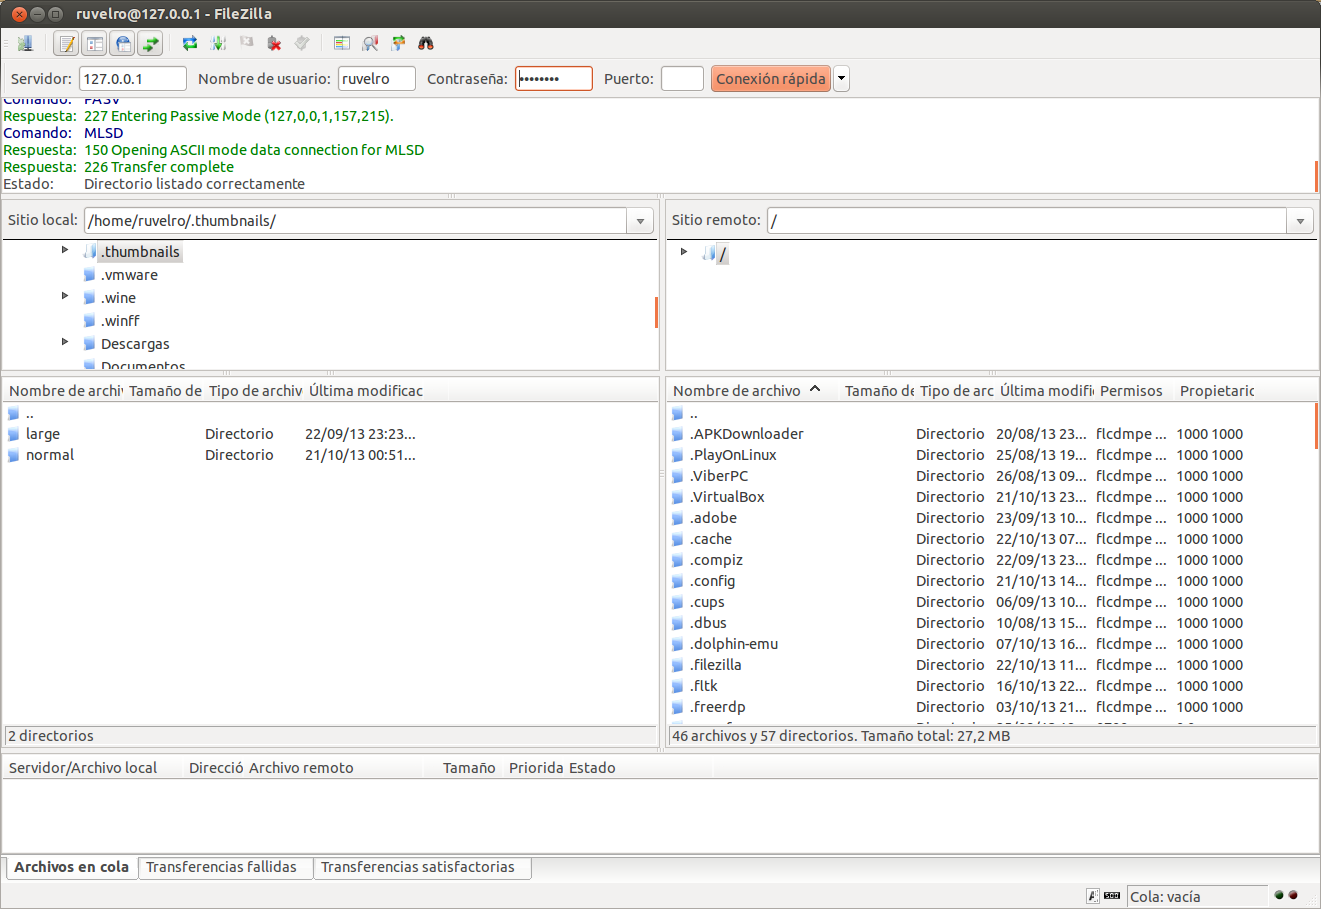
We will verify that the server is working for us. For this we will use a client like FileZilla and we will connect to our account.
Create users and passwords for FTP
The process for creating users is the same as creating them on the system since proftpd uses system users by default. You must type the following parameters in a terminal:
sudo adduser usuario
(we create the user)
Next, we'll set the password for it:
sudo passwd usuario
(we create the password for the user "user")
From now on, "user" will be able to connect to the FTP and will access, by default, the folder specified in DefaultRoot.
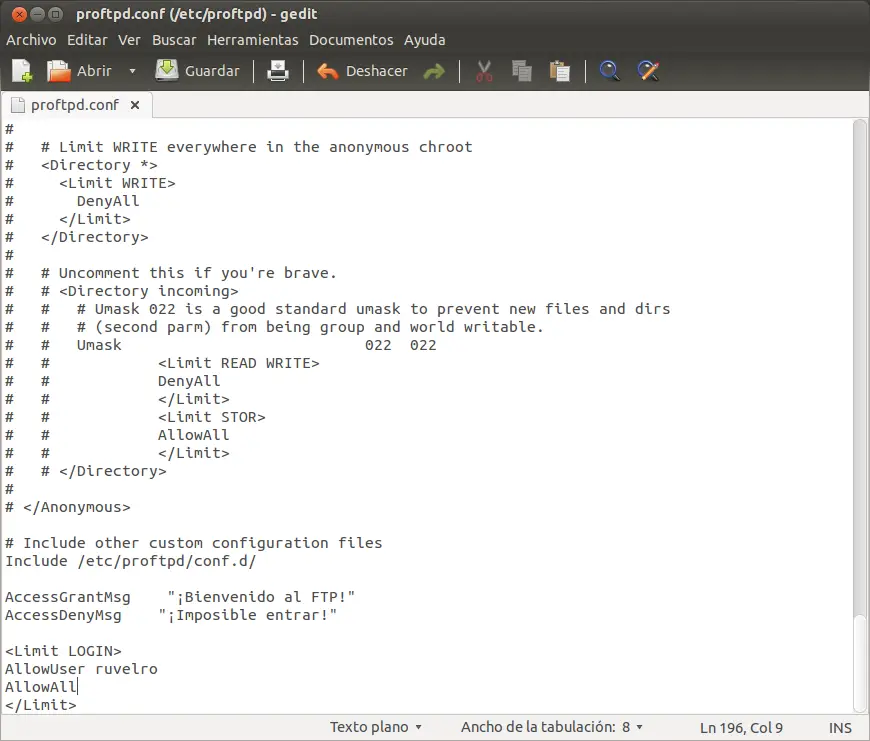
Allow and deny users
We can control which users can and cannot connect to our server in a very easy way. To do this, we open the config file and add the following at the end:
<Limit LOGIN>
AllowUser ruvelro
DenyAll
</Limit>
The other parameters we can use here are:
- AllowUser: This allows us to allow a specific user.
- DenyUser: we are blocking access to a specific user.
- DenyAll: We are blocking access to all users except those specified with AllowUser.
- AllowAll: allows users as "anonymous" to connect to FTP.
For example, if we want to allow anonymous connections to our FTP, we need to add the AllowAll parameter to the previous group, leaving it as follows:
<Limit LOGIN>
AllowUser ruvelro
AllowAll
</Limit>
To add a new user, we need to create a user account in our Ubuntu and access the FTP server with your account credentials.
Other useful commands for proFTPd
We can query a connection and activity log with the following parameter:
sudo cat /var/log/proftpd/proftpd.log
We can consult the users connected to our FTP server in real time with the following commands:
ftpwho
ftptop
Configure FTPES on the proFTPd server for security
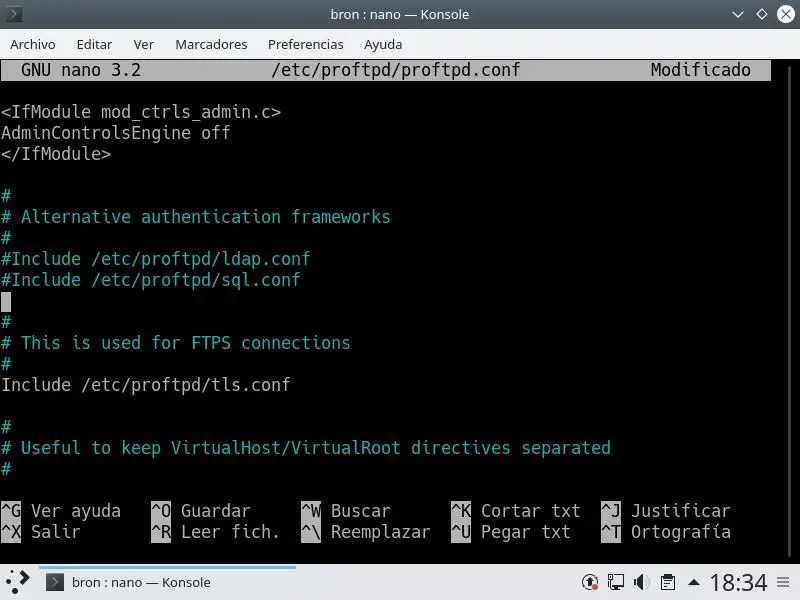
FTPES is known as Explicit FTP , this protocol allows us to connect to the TCP port 21 of the FTP server, and before authenticating and starting to transfer information, a TLS 1.2 or TLS 1.3 layer is added to protect all information. Therefore, with FTPES, we will continue to use the popular port 21, or whatever port you want to use. We also have the possibility of only allow FTPES connections , and leave out FTP connections, so that authentication and file transfer are secure. Due to the use of TLS / SSL protocol, we need to configure an RSA or similar certificate on the server, along with its public key and private key, to be able to properly configure the FTP service.
The first thing we need to do is activate the directive in the main proFTPd config file, uncommenting the part of “Include /etc/proftpd/tls.conf”, as you can see below:
Now we are going to create the RSA digital certificate, we will need both the public key and the private key that it generates, so that the clients can properly connect to the proFTPd server with FTPES. ProFTPd itself incorporates a tool that greatly automates the certificate creation process, this tool is called proftpd-gencert, and it is very easy to use:
root@debian-vm:/home/bron# proftpd-gencert

Generating a RSA private key

.............................................................................................................+++++

...............+++++

writing new private key to '/etc/ssl/private/proftpd.key'

-----

You are about to be asked to enter information that will be incorporated

into your certificate request.

What you are about to enter is what is called a Distinguished Name or a DN.

There are quite a few fields but you can leave some blank

For some fields there will be a default value,

If you enter '.', the field will be left blank.

-----

Country Name (2 letter code) [AU]:ES

State or Province Name (full name) [Some-State]:RedesZone

Locality Name (eg, city) []:RedesZone

Organization Name (eg, company) [Internet Widgits Pty Ltd]:RZ

Organizational Unit Name (eg, section) []:RZ

Common Name (e.g. server FQDN or YOUR name) []:RedesZone.NET

Email Address []:webmaster
Use the following information in your ProFTPD configuration:
TLSRSACertificateFile /etc/ssl/certs/proftpd.crt

TLSRSACertificateKeyFile /etc/ssl/private/proftpd.key
See /etc/proftpd/tls.conf for suggested TLS related configuration

items and include that file in your /etc/proftpd/proftpd.conf file.
root@debian-vm:/home/bron#
But we'll show you how to do it "manually" to select the RSA key length you want. To do this, we will have to run the following command:
openssl genrsa -out /etc/ssl/private/proftpd.key 4096
This command generates the private key with RSA 4096 bits, later we will have to generate the public digital certificate which will be shared with the clients:
openssl req -new -x509 -days 1460 -key /etc/ssl/private/proftpd.key -out /etc/ssl/certs/proftpd.crt
We indicate that we want it to expire in 1460 days, and here we will have to import the private key and then export the proftpd.crt certificate to this directory. The process we went through is as follows, as you can see in this folder:
root@debian-vm:/home/bron# openssl genrsa -out /etc/ssl/private/proftpd.key 4096

Generating RSA private key, 4096 bit long modulus (2 primes)

...................................................................................................................................................................++++

..................................................++++

e is 65537 (0x010001)

root@debian-vm:/home/bron# openssl req -new -x509 -days 1460 -key /etc/ssl/private/proftpd.key -out /etc/ssl/certs/proftpd.crt

You are about to be asked to enter information that will be incorporated

into your certificate request.

What you are about to enter is what is called a Distinguished Name or a DN.

There are quite a few fields but you can leave some blank

For some fields there will be a default value,

If you enter '.', the field will be left blank.

-----

Country Name (2 letter code) [AU]:ES

State or Province Name (full name) [Some-State]:RedesZone

Locality Name (eg, city) []:RZ

Organization Name (eg, company) [Internet Widgits Pty Ltd]:RZ

Organizational Unit Name (eg, section) []:RZ

Common Name (e.g. server FQDN or YOUR name) []:RZ

Email Address []:webmaster

root@debian-vm:/home/bron#
Once we have done that, we can edit the "etc / proftpd / tls.conf" configuration file, which has this default configuration:
# Proftpd sample configuration for FTPS connections.

#

# Note that FTPS impose some limitations in NAT traversing.

# See http://www.castaglia.org/proftpd/doc/contrib/ProFTPD-mini-HOWTO-TLS.html

# for more information.

##TLSEngine on

#TLSLog /var/log/proftpd/tls.log

#TLSProtocol SSLv23

#

# Server SSL certificate. You can generate a self-signed certificate using

# a command like:

#

# openssl req -x509 -newkey rsa:1024

# -keyout /etc/ssl/private/proftpd.key -out /etc/ssl/certs/proftpd.crt

# -nodes -days 365

#

# The proftpd.key file must be readable by root only. The other file can be

# readable by anyone.

#

# chmod 0600 /etc/ssl/private/proftpd.key

# chmod 0640 /etc/ssl/private/proftpd.key

#

#TLSRSACertificateFile /etc/ssl/certs/proftpd.crt

#TLSRSACertificateKeyFile /etc/ssl/private/proftpd.key

#

# CA the server trusts...

#TLSCACertificateFile /etc/ssl/certs/CA.pem

# ...or avoid CA cert and be verbose

#TLSOptions NoCertRequest EnableDiags

# ... or the same with relaxed session use for some clients (e.g. FireFtp)

#TLSOptions NoCertRequest EnableDiags NoSessionReuseRequired

#

#

# Per default drop connection if client tries to start a renegotiate

# This is a fix for CVE-2009-3555 but could break some clients.

#

#TLSOptions AllowClientRenegotiations

#

# Authenticate clients that want to use FTP over TLS?

#

#TLSVerifyClient off

#

# Are clients required to use FTP over TLS when talking to this server?

#

#TLSRequired on

#

# Allow SSL/TLS renegotiations when the client requests them, but

# do not force the renegotations. Some clients do not support

# SSL/TLS renegotiations; when mod_tls forces a renegotiation, these

# clients will close the data connection, or there will be a timeout

# on an idle data connection.

#

#TLSRenegotiate required off
The configuration file we need to have in /etc/proftpd/tls.conf is as follows:
TLSEngine on
TLSLog /var/ftpd/tls.logTLSProtocol TLSv1.2 TLSv1.3
TLSRequired disabled
TLSRSACertificateFile /etc/ssl/certs/proftpd.crt
TLSRSACertificateKeyFile /etc/ssl/certs/proftpd.keyTLSVerifyClient disabled
TLS Renegotiate none
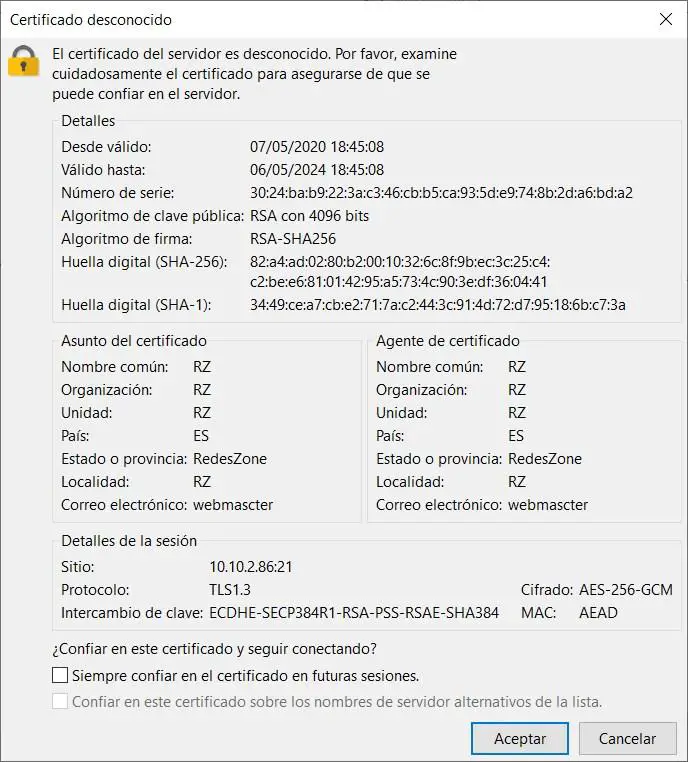
We save the file and proceed to restart the proFTPd service with what we learned earlier. When we go to connect we will see that we connect efficiently with TLS 1.3 with secure key exchange and with AES-256-GCM encryption which will provide us with the best security and performance.
You can also create certificates based on ECC, since proFTPd integrates "TLSECCertificateFile" and also "TLSECCertificateKeyFile" directives for this. You can see all the options available on FTPES and TLS in proFTPd on the mod_tls official website .
As we can see, proFTPd is a very powerful and easy to configure FTP server. With ProFTPd we will not have any problems, for example, when we have to use the server with several users at the same time or when we have to share files with several users at the same time. Thanks to its advanced configuration options, we have the possibility to set all the parameters of the FTP server in detail, this software is more powerful and advanced than vsftpd, another of the quintessential software to create an FTP server on Linux systems.
Proftpd is also compatible with FreeBSD and derived operating systems, for this reason, NAS server oriented operating systems such as XigmaNAS or TrueNAS have this software to function as an FTP server.