How to take a screenshot on Mac
Most people know how to take screenshot under Windows , because on the keyboard of the computer himself, we find the touch useful " Print screen «. But do you know how to take screenshots on computers Mac OS as Mac ou MacBook ? With our tips guide, you will learn all the possible options available to us for taking screenshots on le hardware Apple Lossless Audio CODEC (ALAC), , from the most simple or complex keyboard shortcuts to applications specially designed for this, as well as several possibilities to manage the images obtained after capture. Then,how to take screenshots on macOS based computers such as Mac or Macbook .
How to take screenshots on macOS
Below we offer you several options for taking screenshots on macOS , keyboard shortcuts to different configuration options operating system.
How to take a full screen photo
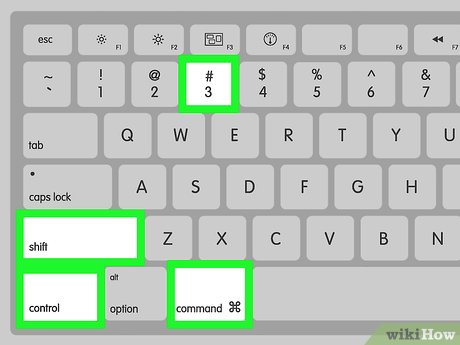
The first step is to learn how to take a screenshot in the easiest way, which will allow us to save a whole screen image . To do this, just press the key combination Cmd+Shift+3 ; A full screen screenshot will be automatically taken, an image that will be automatically saved to the office of the computer or where it is saved by default.

How to take a screenshot of a single game
On the other hand, we may not want to capture the entire image on the screen, so it is also possible to capture only part of it ; For this reason, macOS allows us to capture only the part that interests us by selecting the area by dragging the cursor on the screen at the same time as we press the key combination Cmd+Shift+4 . The cursor will automatically turn into a crosshair, which will allow us to select the part of the screen that interests us and save the image when we release the cursor.

In addition, if we make a mistake while capturing the image, we can modify the selected area before releasing the cursor; depending on the key pressed, one option or another will be executed:
- Shift: modify the area with a horizontal or vertical limitation
- Option: change the selected area from the center to the outside
- Space bar: modify the selected zone
How to take a screenshot of a window
Beyond capturing a full screen image or just a part of it, you can also only capture a certain window open on the macOS desktop, in order to obtain a crisp image without other distracting elements. To do this, just press Cmd+Shift+4 then on the space bar . The cursor will change to camera icon , which will allow us to select the window we want to capture by clicking on it; the capture will be saved automatically, displaying only the selected window.
How to take a screenshot with a timer
In this case, it is necessary to resort to the official macOS application to take screenshots called Snapshot . So if we want to make a screenshot with a timer , we need to access the official Instant app in the folder Utilities . Once opened, choose Capture - Screen with timer . A timer of 10 seconds will be automatically activated to take a screenshot automatically after this period.

How to take a screenshot showing the cursor
If we want to highlight an item on the screen using the mouse pointer, we can also take screenshots showing said cursor . To do this we need to take the screenshot through the app Preview . Once we have accessed the app we need to go to File - Screenshot - Whole screen . A countdown will be activated that will allow us to place the cursor where we want on the screen; Once the screen is captured, the image will also display the cursor.
How to capture the lock screen
MacOS computers display a lock Screen before the user logs in or when exiting standby mode; Whether or not it is interesting to take a screenshot of a lock screen, it is possible to do so. To do this, lock the screen with Ctrl+Cmd+Q , then press the key combination Cmd + Shift + 3 . When we unlock the screen again, the screenshot will appear on our desk or the default location for screenshots.

How to take a JPEG or TIFF screenshot
By default, screenshots in macOS are saved in the format PNG , but via the app Snapshot , we can configure the format of the screenshots so that they are saved in other image formats such as JPEG ou TIFF . To do this, open the app Snapshot and go to the tab Capture - Selection - Window - Screen ou Display with timer . When you are finished capturing, save the file by going to File - Save and choose the file name and the format you want to save it in, such as . Png , . Jpeg ou .tiff .

Main formats for saving screenshots:
- png: Portable network graphic
- pdf: Portable document format
- jp2:JPEG2000
- tif: Tagged Image File Format (TIFF)
- gif: Graphics exchange format
- pct: Picture QuickDraw Macintosh (PICT)
- bmp: Microsoft Windows Bitmap
- sgi: Silicon Graphics
- tGA: Truevision Targa
How to take a screenshot of the Touch Bar
The teams MacBook Pro include the possibility of making Touch Bar screenshots , ie from the secondary window of this computer. To do this, you must press Cmd+Shift+6 and a capture will be automatically saved with the image of the secondary screen of the equipment.

How to take a screenshot with SnapNDrag Pro
We may also choose third-party applications via iTunes , apps that can be free or paid and that can give us even better results than the default macOS methods. Among the most recommended options we find the payment application SnapNDrag Pro , an application that will allow us to obtain optimal results with:
- One-click screenshots
- Organization by folders
- Capture Edit
- Send snapshots to emails or macOS messages directly with the share button
- Drag captures directly to another program
SnapNDrag Pro is available on iTunes at the price of $10,99 .

How to print a screenshot in macOS
Locate the image file of the screenshot; by default, it will be saved on the desk from your computer Mac . Open it by double-clicking; When the image is opened in Preview you select the tab File - Print or press the keyboard shortcut Ctrl + P .
How to change the location where the screenshot is saved
As they say, screenshots on Mac are saved by default on the desk from the macOS computer using keyboard shortcuts. If we take the screenshots with the app Snapshot , captures can be stored in the folder Documents . To change where screenshots are saved, follow these steps:
- Locate where the screenshots are stored and write down the address
- Create a new folder on the desktop called Catches
- Open the application Port located in the folder Applications Utilities of your macOS computer
- Type the following address "by default, write com.apple.screencapture location ~ / Desktop / Captures "(Without