How to work with the Microsoft Excel toolbar and get the most from it? Step by step guide
By default, Microsoft Excel is considered to be the main spreadsheet used in the office environment . Which consists of an arrangement of rows and columns specially designed to be able to perform various office tasks , especially those based on accounting and administration.
Thus, it is considered to be an ideal tool for efficiently managing data , as well as to analyze and manage them, in order to meet certain objectives. Considering that it contains many functions and tools with which it is easy to perform different actions, depending on user needs. Even via Excel , each individual has the opportunity to personalize their experience as much as possible .
This is why this program Microsoft has a utility called "toolbar" and is useful for gaining an optimal user experience. Reason why in this article we will show you which with the main sections of the toolbar and some interesting tips to get the most out of it .
What are all the sections of the Microsoft Excel toolbar and what are they used for?
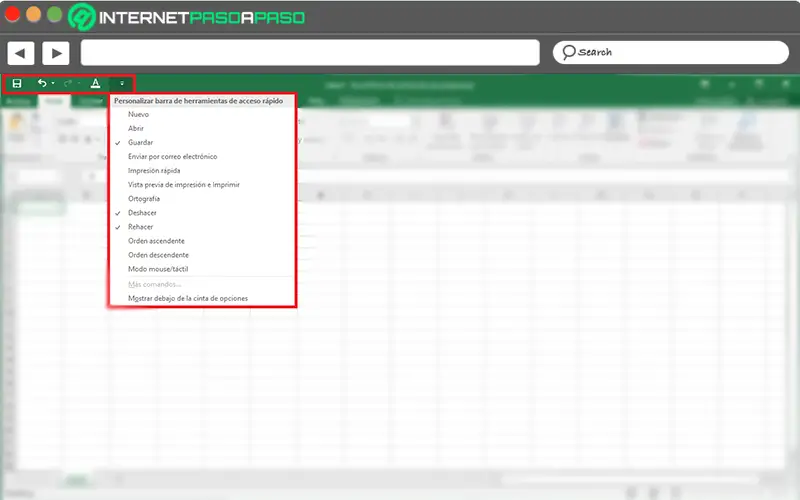
Also known as "Quick access toolbar" ou "Button bar" , the Excel toolbar consists of a utility that serves as a meeting point for the most common command icons. most frequently used in the program , essentially. In other words, it allows you to make the execution of routine commands faster and easier. Therefore, in general terms, these icons can be used for file management, editing, printing, formatting and calculation .
Taking into account that, by default, it is located at the top of the Microsoft Excel ribbon and is a fully customizable bar. In this way, the great strength of the Excel button bar is that it Foum Zguid en supports the ability to be easily configured , depending on the needs of each person.
So, he will be possible to add the commands you want and thus avoid a long search using the tabs available in the options bar. Now, in a specific way, you will wonder what are each of the sections that the Microsoft Excel toolbar contains.
Therefore, below we proceed to mention them and tell you what they are, so that you can get acquainted with this spreadsheet utility in its 2016 version:
New
It is a specific icon that is available in the "File" tab of the program and essentially offers the possibility of open a new program document . In other words, it is used to go to another window Excel and not to open a new worksheet from the same file.
Open
In this case, it is also an icon that is part of the File menu of the standard toolbar and provides access to an Excel file that was previously saved on the computer . Thus, from the same program, you can access one of its documents, without having to search for folders on the computer .
save
Without a doubt, this icon is one of the most iconic on the toolbar. Microsoft Excel and, as the name suggests, it is used to save the file which is active at this precise moment . In view of this, this option also corresponds to the menu on the File tab.
Sent by email
If, regularly, you must send your Excel files by e - mail , it is better to activate this section in the toolbar. Who, in particular, is responsible for sharing the document in question with another person by email . Thus, it will not be necessary to open your email account through an additional window to do so.
Fast printing
To make direct prints of your Microsoft Excel document , we recommend that you use this option, which you can activate directly from the program toolbar. So, he will be much faster and more efficient to get your file in physical format .
Print preview and print
Unlike many users who choose to have quick prints of their digital files, there are many others who prefer to preview it before getting it in physics and for them it is recommended to activate this section of the button bar Excel . Ce which allows you to see what you are going to print before approving said action .
Spelling
This option works as a spell checker with which it will be easier and faster to optimize your document Excel , in terms of grammar. Since then he is responsible for checking the spelling of the entire file , in order to improve any existing errors. Therefore, it is always recommended to use this button.
cancel
In short, this option available in the spreadsheet toolbar has the same function as the keyboard shortcut "Ctrl + Z" . This means that it cancels the actions that have been carried out recently and therefore it is classified as a very iconic icon on the toolbar .
Remake
It is a utility which charging simply to redo the actions which, by mistake or for any reason whatsoever, have been removed from the "Cancel" button . Therefore, it is also one of the main icons on the toolbar. Microsoft Excel .
Ascending
As Excel is mainly used to manage digital data, it contains utility that you allows you to organize these numbers in ascending order . In other words, it the class automatically from smallest to largest and therefore is a practical tool for students and professionals who use this software.
Descending order
"UPDATE ✅ Do you want to get the most out of the Microsoft Excel toolbar? ⭐ ENTER HERE ⭐ and learn how to GET FROM SCRATCH! ”
By means of this icon available on the toolbar, you can organize any amount of digital data in descending order or from highest to lowest . Of course, in addition to the above option, there is have extremely useful to activate this icon from the toolbar .
Mouse / touch mode
Basically what this tool allows is to optimize the space between the controls . So if you enable the option to use it with the mouse, you will be able to see the ribbon and commands in standard . While, if you activate the option to use it with a touchscreen device, you get more space to optimize its use .
Excel tips for getting the most out of the toolbar
Although this is true, the toolbar offers the possibility to add functions so that the user can have them with just one click and that means that it was designed with the aim of simplifying the experience of people working with Excel .
For this reason, luckily there are several tricks with which it is easy to get the most out of this utility, and then we tell you what they are:
Create a custom taskbar

You may wish create new toolbars for better organize orders or for add buttons that perform certain custom actions.
In this case, you will need to perform the following steps:
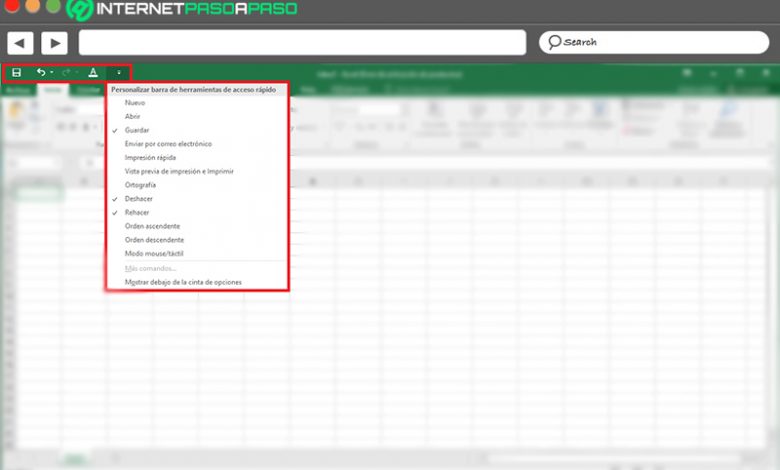
- To get started, go to the program toolbar and right click on it. Then, among the options available, select "Customize the quick access toolbar" .
- Then, in the new window that appears, click on the "Quick Access Toolbar" option .
- Now in the box that says "Customize the quick access toolbar" , you just have to choose the icons you want to keep in your personalized toolbar and to click on "Add" .
- Finally, when you have added all the utilities to display in the button bar, click on "OK" and so new options will be displayed in this tool (depending on your needs).
Add a calculator from the toolbar

This trick basically consists of add quick access to Windows calculator directly from the button bar Excel .
To do this, the procedure to be carried out consists of:
- From any document in the spreadsheet, go to the toolbar at the top and click on the arrow icon that corresponds to "Customize the quick access toolbar" .
- Then when the menu opens, select the option "More orders" below.
- Now once the corresponding dialog opens, you will be able to see all the available items in the list and there you have to look for the calculator .
- Once done, click on the "Calculator now" selection , Push the button "Add" and finally, click sure OK" below.
Include icons in the toolbar from the ribbon
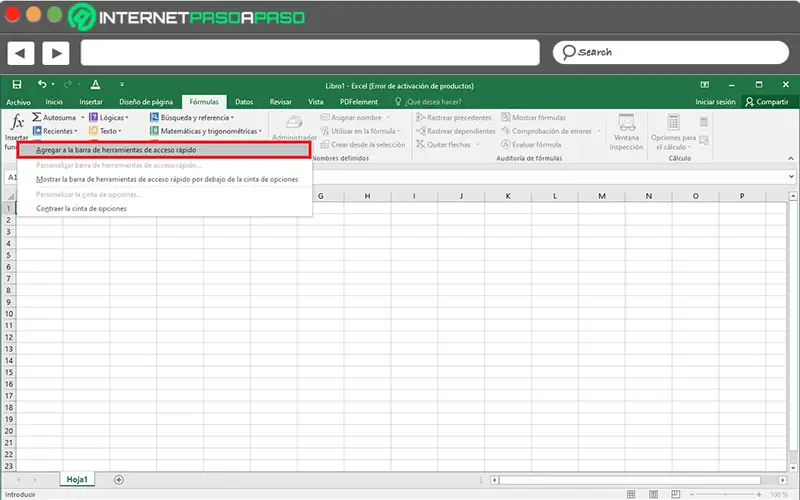
Besides adding icons to the toolbar itself, you can also do this via the Microsoft Excel ribbon . So if you see a feature that you want to have on hand, you can use it quickly.
For this, you can add it in a few steps :
- From any tab of the options bar , find the tool that catches your eye, and keep it in the software toolbar.
- Once you have it, right click on its icon and among the options available in the menu that appears, click on "Add to Quick Access Toolbar" .
- Once this is done, the function will be at once displayed in the program button bar . Which, by default, is at the top of the window.
If you have any questions, please leave them in the comments, we will get back to you as soon as possible, and it will be a great help for more community members as well. Thank you!